...
In OpenMRS, Click the "Administration" link near top of the page
Click the "Manage Critic Notifier" link (under the "Notifiable Condition Detector" heading) as bellowbelow,

The Mange Critic Notifier page will be loaded as bellow;

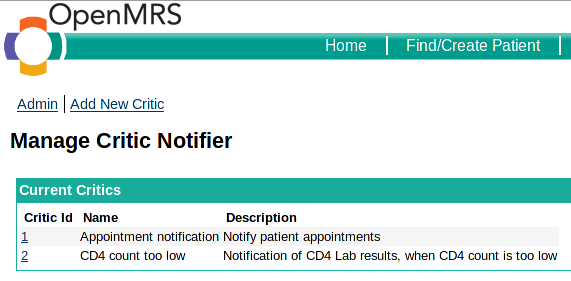
To create a new Critic click on "Add New Critic" link to open the Notification Critic page.
To edit an existing Critic, click the appropriate Critic Id links under the "Critic Id" column to open and edit that Critic through the Notification Critic page.

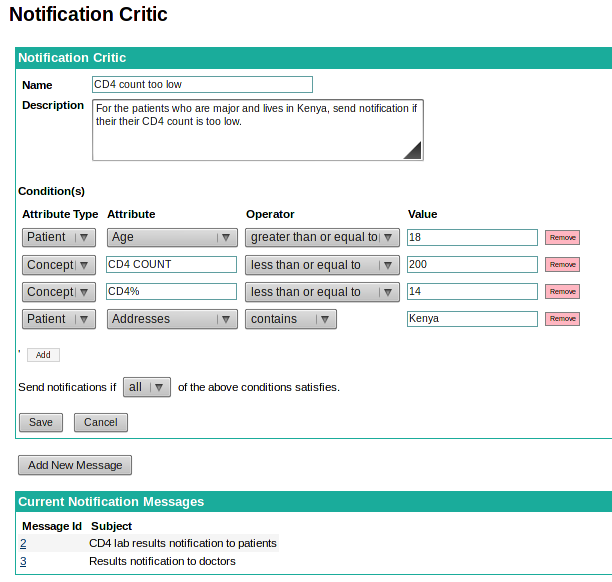
The critic can be added or edited through the Notification Critic page.
...
To add a new Condition click on the "Add" button under the Condition(s) heading in the Notification Critic page.
Condition has an attribute type; Patient or Concept.
- Select Patient if the condition is based on a Patient attribute.
- Select Concept if the condition is based on a concept value that is related to an Encounter.
After selecting Attribute Type an Attribute has to be selected.
- If Patient Attribute Type is selected, select one of the given Patient Attributes from the drop-down menu.
...
- If Concept Attribute Type is selected, enter the concept name in the text-box, while entering
...
- auto-complete will suggest some concepts available in the system for you to select from.
For the Attribute selected, based on their kind (i.e Numeric, String, Date or Boolean) appropriate Operators will be shown under drop-down menu.
Select the relevant Operator according to the Condition.
Enter In the text-box on "Value" column, enter the value that needs need to be compared for in order to the condition to be satisfied in the text-box on "Value" column.
For the Date Attributes an additional drop-down will appear after the Value text-box to specify the value type (e.g. Hour(s), Week(s), Day(s), Month(s)). Select the appropriate Value Type form drop-down.
To add another condition click on the "Add" button or to
To remove the existing condition click on the "Remove" button on the appropriate condition row.
"Send notification if any/all condition satisfies" is used to aggregate the defined conditions.
- Select "all"
...
- If all the conditions needs to be
...
- satisfied in order to send notifications
...
- .
- Select "any"
...
- if a single condition
...
- being satisfied is enough for the notification to be sent.
To save the changes click on the "Save" button.
To cancel and go back to the Admin page click on the "Cancel" button.
...
Add a Message Template click on "Add New Message" button.
Or to edit an existing Message Template click on the appropriate Message Id links under the "Message Id" on the Notification Critic page.
...
In the "Message" text-area enter the template of the message that needs to be sent.
Enter the customizable contents using withing square brackets [ ]
- For Patients attributes enter the Patients Attribute names within the square brackets
...
- [ ].
E.g. Name -> [name] - For Concept Attributes enter the Concepts attribute Ids within the square brackets
...
- [ ].
E.g. CD4 COUNT -> [1597] , assuming the Concept Id of CD4 COUNT in 1597
"Send On" field is used to determine when to send the message.
...
Select Immediately if the notification message needs to be send at the encounter occourencoccurrence
Select Or select the Messaging Condition and enter a the Date Attribute to send delay the Message Notification when this Condition Satisfies
Configure Task
Todo
...
till the Message Condition get Satisfied.
Configure Schedule Task
Schedule Task needs to be configured in-order to send the message delayed by the Messaging Condition.
Configure the Schedule Task per the following steps:
- In OpenMRS, Click the "Administration" link near top of the page
- Click the "Manage Scheduler" link (under the "Scheduler" heading)
- Click on "Add Task" link to create a new task.
- Click on the "Task Configuration" Tab link
- Enter a name for the task E.g. "NCD Critic Notifier Task"
- Enter the "Schedulble Class" as "org.openmrs.module.ncd.notifiercritic.tasks.ProcessCriticsTask"
- Enter an appropriate Description E.g.Process Encounters and send email, sms notifications
- Click on the "Schedule" Tab link.
- Enter the "Repeat interval" Field as 1 hour.
- Click on the "Save" button.
About
This module was developer developed by Sriskandarajah Suhothayan (Suho).