Welcome
The OpenMRS Appliance is a virtual appliance (also known as a virtual machine or VM) running OpenMRS. A virtual appliance is a fully pre-installed and pre-configured application and operating system environment. This is an easy way for you to use OpenMRS without installing all the OpenMRS requirements (Java, Tomcat, MySQL, etc) and configuring them to work on your computer. Don't believe us? Watch the video!
While the OpenMRS Appliance is the oldest of the bunch, there are a few other OpenMRS appliances that you should check out.
- OpenMRS Standalone Installer - By far the best way to get started with OpenMRS.
- OpenMRS Development Appliance - OpenMRS, Eclipse and MySQL Navigator on Ubuntu Desktop.
- OpenMRS Appliance from iTech - OpenMRS on SUSE. Works on Amazon EC2.
Download
You can get to downloads via the OpenMRS download page or by going directly to the files on sourceforge. Appliances may not be available for every maintenance version.
Latest stable
Older Versions
Requirements
You will need 512 MB of RAM and 1 GB of hard disk space free to install and use this appliance. You will also need the 7z file archiver to uncompress the appliance and a virtual machine player to run it. Use the links below to get these components. While we recommend the free VMWare player, VirtualBox is free and open-source.
- Windows: 7-Zip and VMWare Player/VirtualBox
- Macintosh: UnArchiver and VMWare Fusion/VirtualBox
- Ubuntu: 7-zip and VMWare Player/VirtualBox
- UNIX/Linux: 7-zip and VMWare Player/VirtualBox
Installation
Download the latest OpenMRS Appliance (or OpenMRS_N.N.N.vmwarevm.7z) from the Releases page.
Double click OpenMRS_N.N.N.vmwarevm.7z to uncompress it. It should use the 7z archiver you downloaded earlier. Once uncompressed, you should now have an OpenMRS_N.N.N.vmwarevm folder.
Using VMWare
If you are on a Mac, double click OpenMRS_N.N.N.vmwarevm to launch the appliance. If you are on Windows or Linux, double click OpenMRS_N.N.N.vmwarevm and then double click the OpenMRS.vmx (1KB) file to launch the appliance.
Using VirtualBox
Go to File > Virtual Disk Manager. Click Add, locate and select the copied .vmdk file and click OK. Now click New, choose a Linux/Ubuntu image, then choose the vmdk file as your file system and click Finish. In the settings for this image, make sure the processor has PAE enabled (System > Processor). Start the image.
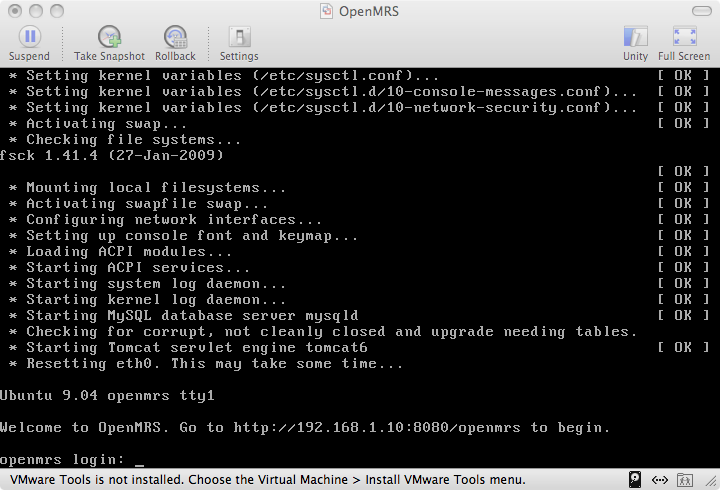
You will be shown a lot of text as the appliance boots, but the last thing you should see is "Welcome to OpenMRS. Go to http://192.168.1.10:8080/openmrs" or something similar. Note that your welcome message will have a different location than described in this example. When you see the message, launch a web browser and go to the location your appliance specifies.
You might have to go to a command prompt (In Windows, Start->Run and type cmd), from there go to the Virtual box directory, something like C:\Program Files\Oracle\VirtualBox, and type VBoxManage modifyvm "VM Name" --natpf1 "guestssh,tcp,,8000,,8080" and from there on your web browser you'll be able to go to http://localhost:8000/openmrs to see the Virtual Machine.
The login is "openmrs" and the password is "openmrs".
Configuration
You can now proceed with the OpenMRS setup wizard. Outlined below are recommended defaults if this is the first time you are using OpenMRS. Only change what is noted below.
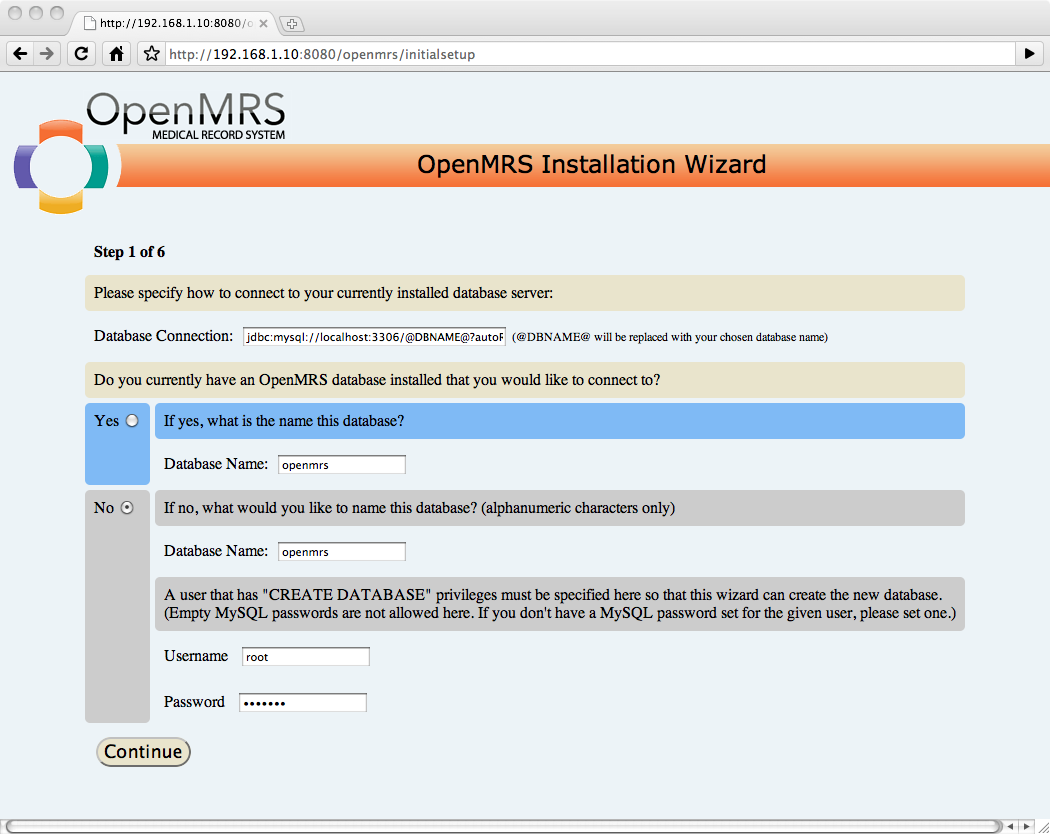
Step 1
Under Do you currently have an OpenMRS database installed that you would like to connect to?, select No.
Enter root as Username and openmrs as Password and press Continue.
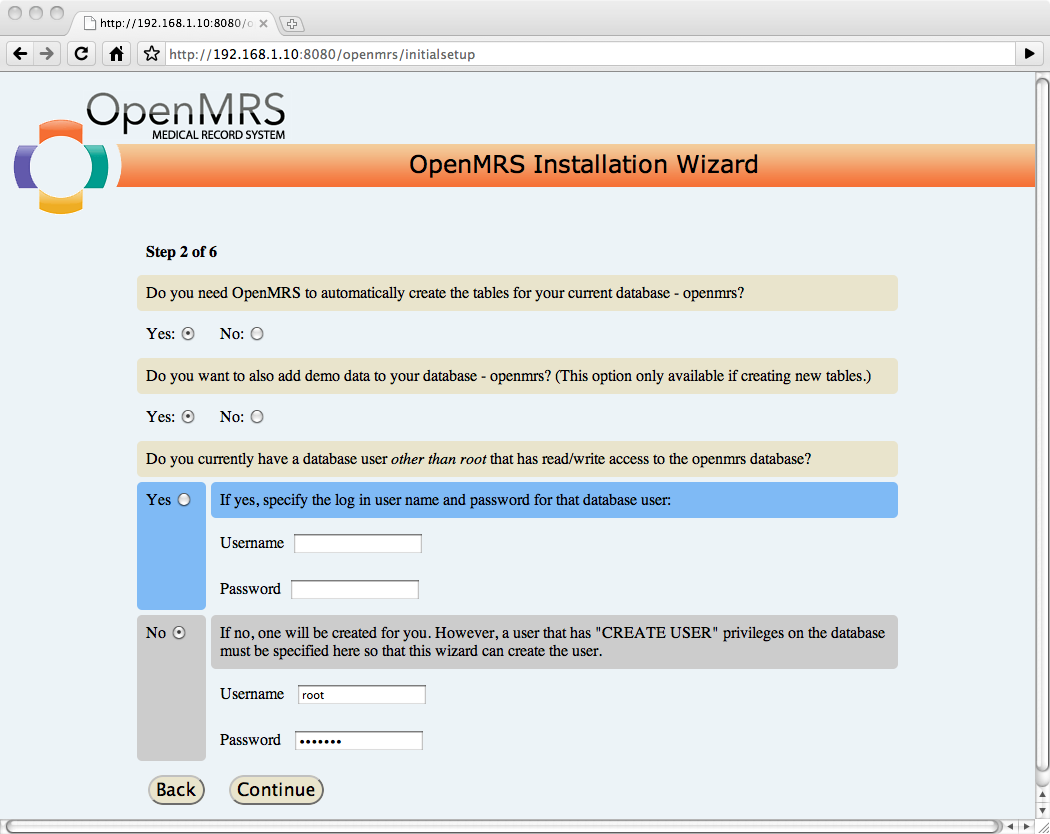
Step 2
Under Do you want to also add demo data to your database - openmrs?, select Yes.
Enter root as Username and openmrs as Password and press Continue.
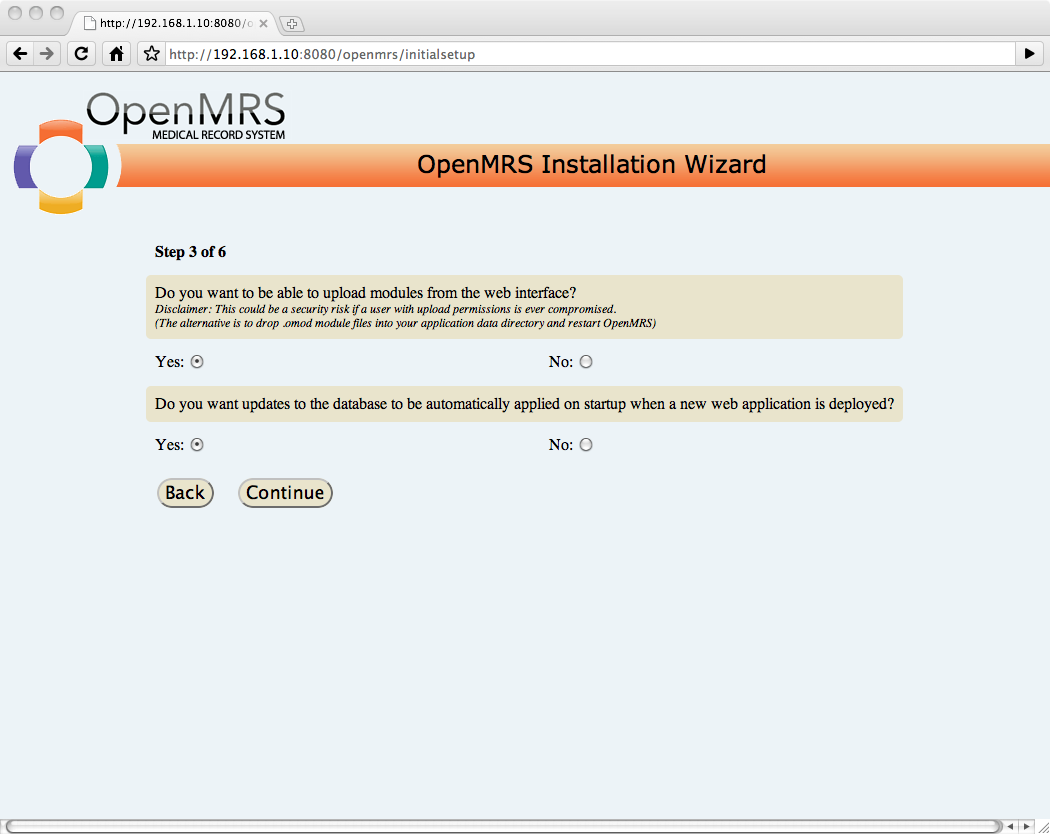
Step 3
Under Do you want updates to the database to be automatically applied on started up when a new web application is deployed?, select Yes and press Continue.
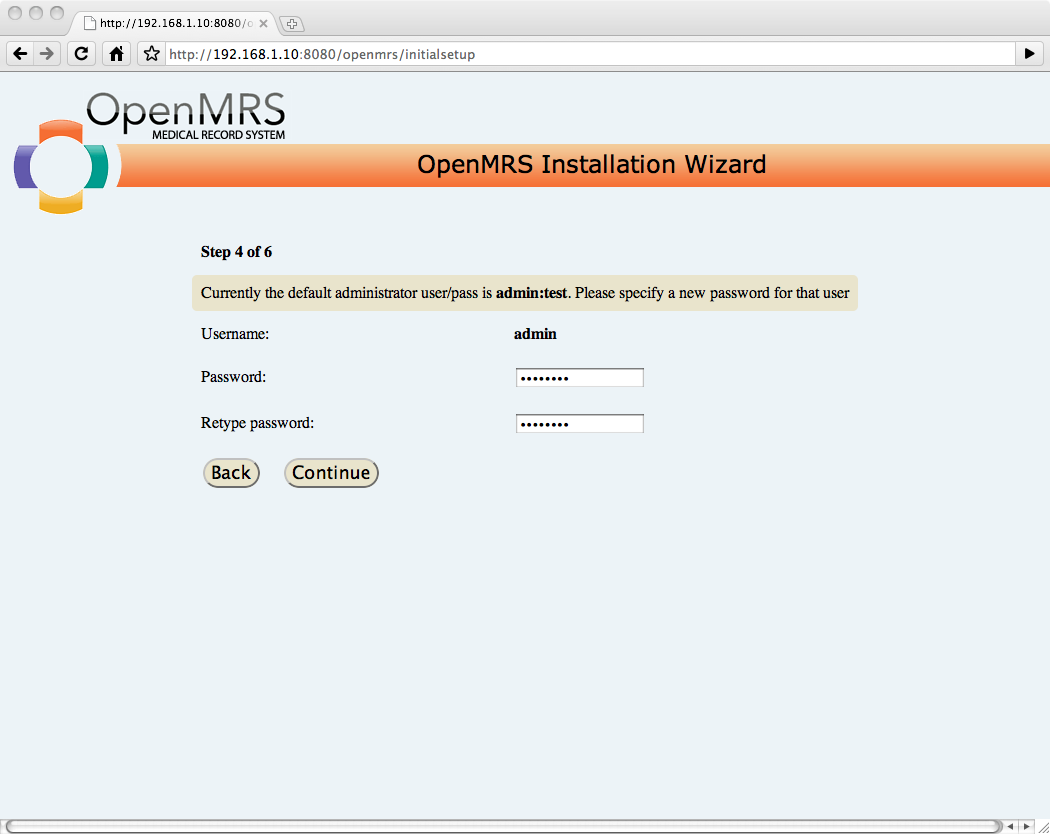
Step 4
Enter and re-enter a long password with mixed case characters and numbers and press Continue.
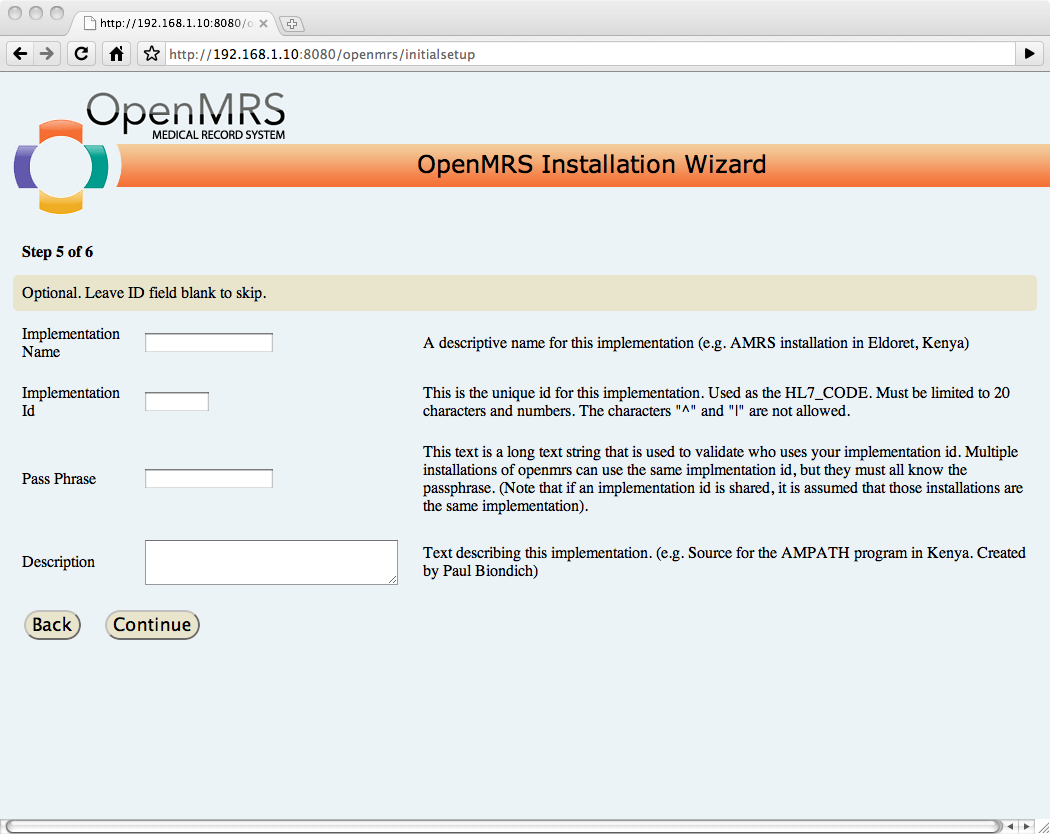
Step 5
Leave everything blank and press Continue.
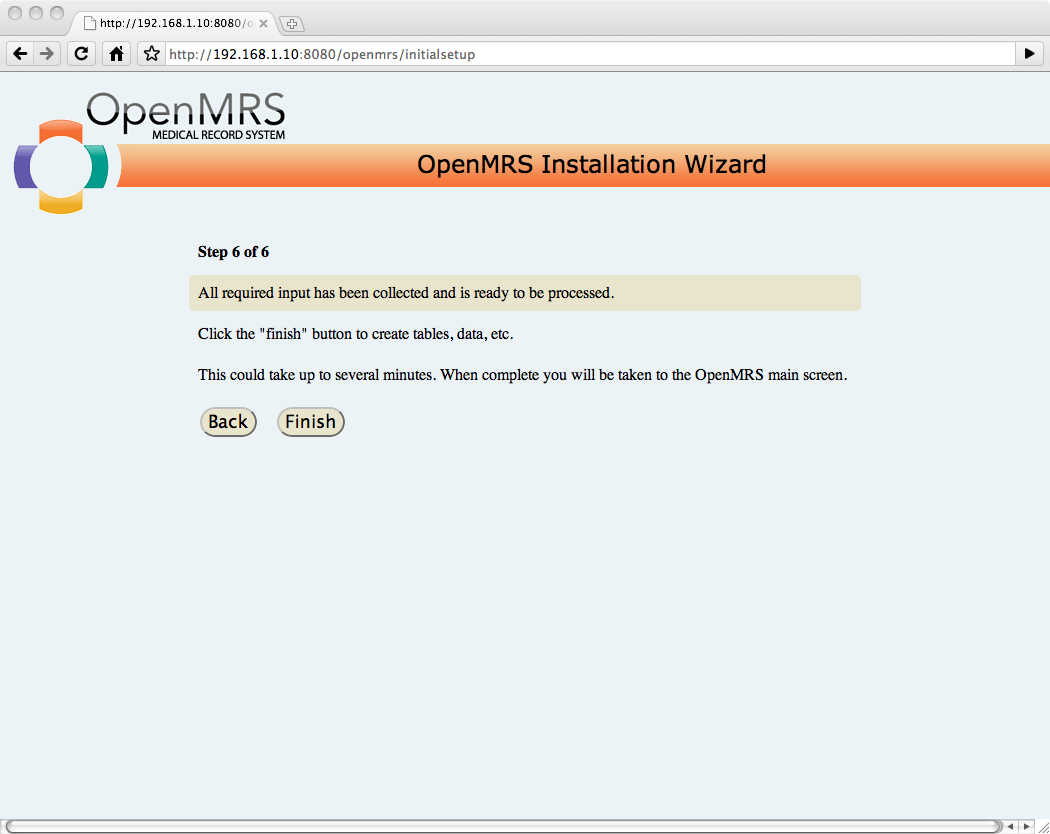
Step 6
Press Finish.
Notes
If you need login or password info, try these defaults:
- OpenMRS: admin/test
- Tomcat: root/openmrs
- MySQL: root/openmrs
- Appliance: openmrs/openmrs
If you want root access you can type the command: "sudo su" and then type the "openmrs" password when prompted.
The appliance is built from an Ubuntu Server (10.04). You can treat it like any Ubuntu install.
The appliance assumes defaults to an internal NAT mode. If you do not get the "Welcome to OpenMRS" message when it starts, your appliance is probably not getting an IP from your VM manager.
The appliance is not meant for production environments. It uses very weak passwords, no encryption and does not support very large datasets. Please do not put patient data into the appliance without considering these limitations.
If you have any questions, email the mailing list for assistance. If you want to help with the next version of OpenMRS appliance, see the repository.
Changelog
v1.7.0: OpenMRS 1.80, Ubuntu 10.04.2
v1.7.0: OpenMRS 1.70, Ubuntu 10.04
v1.6.1: OpenMRS 1.61
v1.6.0: OpenMRS 1.60
v1.5.2: OpenMRS 1.52
v1.5.1: OpenMRS 1.51
v1.5.0: OpenMRS 1.50, Ubuntu 9.0.4, OpenJDK 6.
v1.4.4: OpenMRS 1.44, FormEntry Module 3.6.8
v1.4.1: OpenMRS 1.41
v1.4.0: Tomcat 6, OpenMRS 1.40, FormEntry Module 3.6.3
v1.3.1: OpenMRS 1.31, FormEntry Module 3.3.2
v1.3.0: OpenMRS 1.30
