Skip to end of metadata
Go to start of metadata

You are viewing an old version of this page. View the current version.

Compare with Current View Page History

« Previous Version 9 Next »

With the latest versions of the Registration App, it is now possible to customize it to your specific needs without custom programming.  For example, you can integrate the address hierarchy module and add additional person attributes.  You can see the full list of configuration options in the template definition found at this link, which describes the config fields.

Initial Steps

Follow the basic instructions to disable an App and add a custom App found at System Administration: Manage Apps.

  1. Navigate to System Administration-->Manage Apps
  2. Click the square disable button beside "referenceapplication.registrationapp.registerPatient" to disable the integrated Registration App configuration.
  3. Add a new App Definition by clicking "Add App Definition".
  4. Give your new App a name, perhaps "referenceapplication.registrationapp.myRegisterPat".
  5. Copy the latest template for the registration App, found here (note that the square brackets before and after should not be used). 
  6. Paste this into the Definition (required) field.
  7. Modify the ID to represent the ID you specified in step 4 above.  For example, change "id": "referenceapplication.registrationapp.registerPatient", to "id": "referenceapplication.registrationapp.myRegisterPat",
  8. Modify the URL line to represent the ID you specified in step 4 above.  For example, change "url": "registrationapp/registerPatient.page?appId=referenceapplication.registrationapp.registerPatient", to "url": "registrationapp/registerPatient.page?appId=referenceapplication.registrationapp.myRegisterPat",
  9. If you prefer, you can change the "description" and "label" fields to your liking, for example, name them in your language.  You can also change the icon and order to your liking.
  10. Save the new App configuration.

Notes:

  • If you have a syntax error, it will give you an error "Invalid Json", and not let you save it until fixed.
  • If you didn't change the App ID in the Json, it will give you an error "The App ID should match the one in the definition" when you try to save it.
  • If the App name is too long, it will give you an error like, "Failed to save referenceapplication.registrationapp.myRegisterPatient", and not let you save it.

Add Person Attributes

To add a person attribute follow these simple additional steps after completing the Initial Steps above.

  1. Find the UUID of the Person Attribute Type (s) that you want to add to the Registration App. 
    1. Go to System Administration --> Advanced Administration --> Manage Person Attribute Types
    2. Click on the name of the Person Attribute, for example "Mother's Name".
    3. You will find the UUID listed in grey, for example... 8d871d18-c2cc-11de-8d13-0010c6dffd0f
  2. Open the App you created in the Initial Steps above.
  3. In the list of sections you can add a new section, or you can simply add the person attribute to an existing section.  Sections and fields are separated with a comma.  The code to add a question of Mother's Name is...

    Mother Name Person Attribute Field
          {
           "type": "personAttribute",
           "label": "Mother's Name",
           "formFieldName": "mothersName",
           "uuid": "8d871d18-c2cc-11de-8d13-0010c6dffd0f",
           "widget": {
                      "providerName": "uicommons",
                      "fragmentId": "field/text"
                     }
           }

    If you want to add the question in a section of it's own, you would use something like this, placed in the list of sections...

    Person Attribute in own section
    {
        "legend": "My Person Attribute",
        "id": "myPersonAttributeLabel",
        "fields": [
          {
           "type": "personAttribute",
           "label": "Mother's Name",
           "formFieldName": "mothersName",
           "uuid": "8d871d18-c2cc-11de-8d13-0010c6dffd0f",
           "widget": {
                      "providerName": "uicommons",
                      "fragmentId": "field/text"
                     }
           }
          ]
    }
  4. Change the "uuid": value to the UUID of the Person Attribute that you want to appear in the Registration App.
  5. Save your App and enjoy!

Notes:

  • You must create your Person Attribute Types before adding them to the Registration App. You can find instructions at Managing Person Attribute Types.
  • Coded Person Attributes are not currently supported in the Registration App.
    Error rendering macro 'jira' : Unable to locate Jira server for this macro. It may be due to Application Link configuration.
  • You can add multiple Person Attribute fields to a single section.

A complete Json configuration with Mother's Name Person Attribute would look like this...

Register Patient with Person Attribute
    {
        "id": "referenceapplication.registrationapp.myRegisterPat",
        "instanceOf": "registrationapp.registerPatient",
        "label": "My Register Patient",
        "description": "Create MY new Patient Record",
        "extensions": [
            {
                "id": "referenceapplication.registrationapp.myRegisterPat.homepageLink",
                "extensionPointId": "org.openmrs.referenceapplication.homepageLink",
                "type": "link",
                "label": "My Register Patient",
                "url": "registrationapp/registerPatient.page?appId=referenceapplication.registrationapp.myRegisterPat",
                "icon": "icon-user",
                "order": 1,
                "requiredPrivilege": "App: registrationapp.registerPatient"
            }
        ],
        "config": {
            "afterCreatedUrl": "/coreapps/clinicianfacing/patient.page?patientId={{patientId}}",
            "sections": [
                {
                    "id": "contactInfo",
                    "label": "registrationapp.patient.contactInfo.label",
                    "questions": [
                        {
                            "legend": "Person.address",
                            "fields": [
                                {
                                    "type": "personAddress",
                                    "label": "registrationapp.patient.address.question",
                                    "widget": {
                                        "providerName": "uicommons",
                                        "fragmentId": "field/personAddress"
                                    }
                                }
                            ]
                        },
                        {
                            "legend": "registrationapp.patient.phone.label",
                            "id": "phoneNumberLabel",
                            "fields": [
                                {
                                    "type": "personAttribute",
                                    "label": "registrationapp.patient.phone.question",
                                    "formFieldName": "phoneNumber",
                                    "uuid": "14d4f066-15f5-102d-96e4-000c29c2a5d7",
                                    "widget": {
                                        "providerName": "uicommons",
                                        "fragmentId": "field/text"
                                    },
                                    "cssClasses": ["phone"]
                                }
                            ]
                        },
{
    "legend": "My Person Attribute",
    "id": "myPersonAttributeLabel",
    "fields": [
      {
       "type": "personAttribute",
       "label": "Mother's Name",
       "formFieldName": "mothersName",
       "uuid": "8d871d18-c2cc-11de-8d13-0010c6dffd0f",
       "widget": {
                  "providerName": "uicommons",
                  "fragmentId": "field/text"
                 }
       }
      ]
}
                    ]
                }
            ]
        }
    }

Integrate Address Hierarchy

To use the Address Hierarchy Module in the Reference Application Registration App requires a little configuration to a custom App.  The steps are outlined below.

  1. Ensure the Address Hierarchy Module is installed and configured per the instructions; including configuration of the address levels, marking them all "Required".
  2. Open the App you created in the Initial Steps above.
  3. Under the address section, replace...

    Text Box Address Fields
    "widget": {
              "providerName": "uicommons",
              "fragmentId": "field/personAddress"
              }

    with...

    Address Hierarchy Address Fields
    "widget": {
         "providerName": "registrationapp",
         "fragmentId": "field/personAddressWithHierarchy",
         "config" : {
            "shortcutFor": "address1",
            "manualFields": ["address2"]
            }
    }

Notes:

  • The Shortcuts and Manual Fields that are specified in the config don't work because of Unable to locate Jira server for this macro. It may be due to Application Link configuration.

A complete Json template including the Mother's Name Person Attribute, and Address Hierarchy would look like this...

Register Patient with Person Attribute and Address Hierarchy
    {
        "id": "referenceapplication.registrationapp.myRegisterPat",
        "instanceOf": "registrationapp.registerPatient",
        "label": "My Register Patient",
        "description": "Create MY new Patient Record",
        "extensions": [
            {
                "id": "referenceapplication.registrationapp.myRegisterPat.homepageLink",
                "extensionPointId": "org.openmrs.referenceapplication.homepageLink",
                "type": "link",
                "label": "My Register Patient",
                "url": "registrationapp/registerPatient.page?appId=referenceapplication.registrationapp.myRegisterPat",
                "icon": "icon-user",
                "order": 1,
                "requiredPrivilege": "App: registrationapp.registerPatient"
            }
        ],
        "config": {
            "afterCreatedUrl": "/coreapps/clinicianfacing/patient.page?patientId={{patientId}}",
            "sections": [
                {
                    "id": "contactInfo",
                    "label": "registrationapp.patient.contactInfo.label",
                    "questions": [
                        {
                            "legend": "Person.address",
                            "fields": [
                                {
                                    "type": "personAddress",
                                    "label": "registrationapp.patient.address.question",
"widget": {
     "providerName": "registrationapp",
     "fragmentId": "field/personAddressWithHierarchy",
     "config" : {
        "shortcutFor": "address1",
        "manualFields": ["address2"]
        }
}
                                }
                            ]
                        },
                        {
                            "legend": "registrationapp.patient.phone.label",
                            "id": "phoneNumberLabel",
                            "fields": [
                                {
                                    "type": "personAttribute",
                                    "label": "registrationapp.patient.phone.question",
                                    "formFieldName": "phoneNumber",
                                    "uuid": "14d4f066-15f5-102d-96e4-000c29c2a5d7",
                                    "widget": {
                                        "providerName": "uicommons",
                                        "fragmentId": "field/text"
                                    },
                                    "cssClasses": ["phone"]
                                }
                            ]
                        },
{
    "legend": "My Person Attribute",
    "id": "myPersonAttributeLabel",
    "fields": [
      {
       "type": "personAttribute",
       "label": "Mother's Name",
       "formFieldName": "mothersName",
       "uuid": "8d871d18-c2cc-11de-8d13-0010c6dffd0f",
       "widget": {
                  "providerName": "uicommons",
                  "fragmentId": "field/text"
                 }
       }
      ]
}
                    ]
                }
            ]
        }
    } 

Setup Master Patient Index configuration

You have to setup some global properties:

  1. registrationcore.mpi.implementation : specifies which MPI implementation you are going to use. Since registrationcore v1.4 you can use OpenEMPI implementation.
  2. registrationcore.mpi.url : specifies url to MPI server Property type: string. Example: 128.100.10.10:8080/openempi-admin
  3. registrationcore.mpi.username : username for authentication on MPI server
  4. registrationcore.mpi.password : password for authentication on MPI server
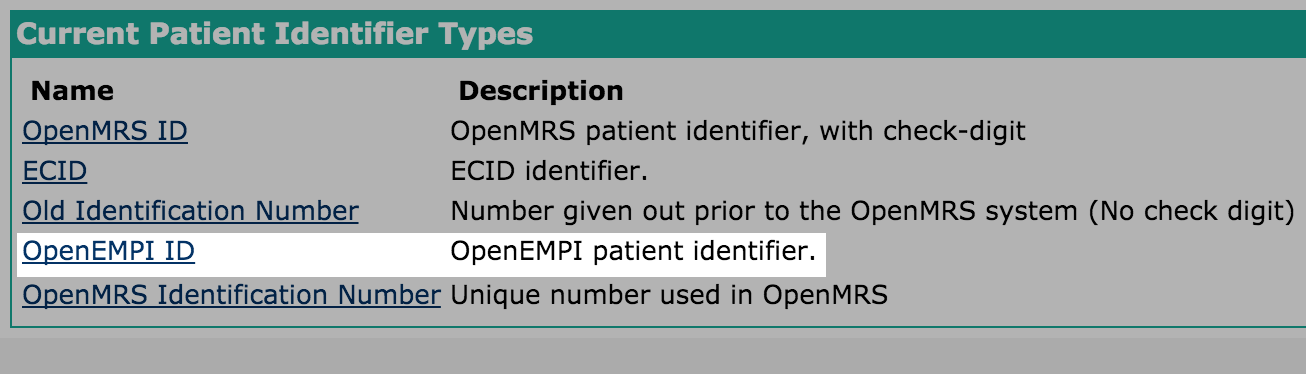
  5. registrationcore.mpi.personIdentifierId : specifies local patient identifier type id. Through this identifier imported MPI patient will be linked with patient on remote MPI server. You have to create new patient identifier type in Managing patient identifiers console: 

OpenEMPI specific properties:

  1. registrationcore.openempi.globalIdentifierDomainId : specifies global identifier type at OpenEMPI server. You can find this value in your admin page at OpenEMPI server. Property type: integer. 
  2. registrationcore.openempi.enableProbabilisticMatching : specifies whether system should search for similar patients. At registrationcore v1.4 this functionality is not supported, so it shopuld be turned off. Property type: boolean (true/false).

Mapping Local to Mpi identifiers:

To map identifiers from MPI server to local OpenMRS application, you have to specify how they maps on each other. Of course, first of all you have to create proper identifier types in Managing patient identifiers console& (For example: you can see that in screenshot above there is ECID identifier, which was created for mapping).

How to specify mapping? You have to create property in Global properties which names:

registrationcore.local_mpi_identifierTypeMap.{name_of_identifier_type} : {local_identifier_type_id} : {mpi_identifier_type_id}

Example: registrationcore.local_mpi_identifierTypeMap.ECID : 5:60

  • No labels