OpenHMIS Cashier Module
- Daniel Shorten
- Jeremy Ogembo
- Andrew Moko
Overview
The OpenHMIS Cashier Module provides a basic interface for bill creation and management. The module aims to be simple and optimized for easy keyboard entry. As of version 3.3, features include:
- Bill management
- Configurable payment modes (e.g. cash, credit card)
- Multiple payments per bill
- Bill adjustments
- Configurable receipt number generator
- Basic time/shift tracking for cashiers
- Cash point management
- Cashier Reports Page
- OpenMRS 2 support for all the Cashier Pages
Requirements
Cashier module dependencies for the 3.x release are as follows:
- Java 1.7
- OpenMRS 1.9.9+
- REST Web Services Module 2.1x
- Jasper Reports Module 1.5.7
- OpenHMIS Commons Module 3.x
- OpenHMIS Backbone Forms Module 2.x
- OpenHMIS Inventory Module 2.x
Download
- Module: https://addons.openmrs.org/#/show/org.openmrs.module.openhmis-cashier
- Source code: https://github.com/OpenHMIS/openmrs-module-openhmis.cashier
Version History
| Version | Released | Release Notes |
|---|---|---|
| 1.1 | 1-Feb-2013 | |
| 1.5.1 | 15-May-2013 | |
| 1.6.1 | 23-Aug-2013 | |
| 1.7.3 | 2-Jul-2014 | |
| 2.0.0 | 24-Sept-2014 | 2.0 Notes |
| 2.1 | 4-Nov-2014 | 2.1 Notes |
| 2.2 | 25-Nov-2014 | 2.2 Notes |
| 2.3 | 19-Mar-2015 | 2.3 Notes |
| 3.0 | 23-Jul-2015 | 3.0 Notes |
| 3.1 | 10-Dec-2015 | 3.1 Notes |
| 3.2.1 | 12-Apr-2016 | 3.2.1 Notes |
| 3.3.3 | 31-Aug-2016 | 3.3.3 Notes |
| 3.4.0 | 02-Nov-2017 | 3.4.0 Notes |
Module Deployment
The Cashier Module is deployed into OpenMRS the same way as all other modules
https://openmrs.atlassian.net/wiki/display/docs/Administering+Modules
Configuration - Getting Started
REST Web Services
The REST Web Services module must first be configured if this has not already been done.
- On the OpenMRS Administration page, click on the REST Web Services - Settings link.
- Update the Rest Web Services URI Prefix setting according to your OpenMRS server URI. For example, if clients connect to the server with the following URI 'http://192.168.1.100:8080/openmrs' then the prefix should be '/openmrs'. For example see the screenshot below:

Cashier Settings
- All the settings for the Cashier Module are done from the Manage Cashier Module Page located in the Cashier Module Dashboard:

- Click on the Manage Cashier Module Above to see the list of Cashier Management Pages. The Cashier Settings page is highlighted below:
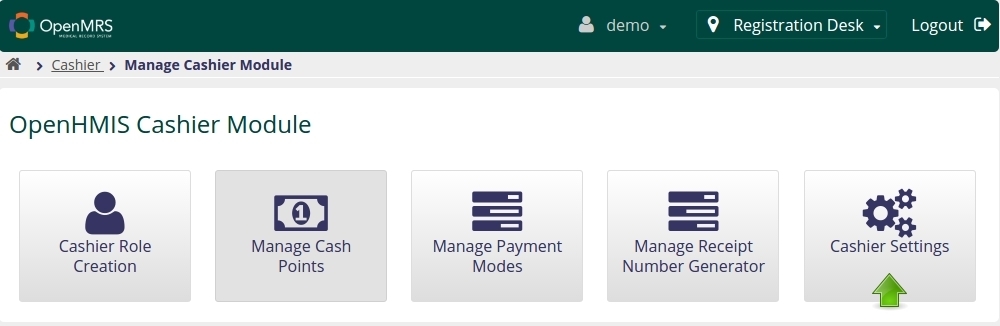
- Once you click on Cashier Settings, you will see a number of options such allowing adjustments, defining rounding and rounding mode and so on:

Cashier Settings Options
- Bill Adjustment: Provides an option for the cashier to edit a bill once it has been processed. Bill adjustment is useful in instances where the cashier was to give a refund.
- There are 2 available True of False settings for Bill Adjustment: Allow Bill Adjustment and Require Adjustment Reason.
- Autofill Payment Amount: When set to True, this option populates the Amount in the Payments Section of the Cashier Bill with the Total Amount due from the selected Line Items.
- Timesheet: True or false setting for Cashier Time tracking. Together with the Shift Reports, this enables tracking of the cashier's logins and amount of money collected during any of the time sheets.
- The cashier setting for enabling the timesheet is Require Timesheet while the available Time sheet reports are: Timesheet Shift Report ID, Daily Shift Summary Report ID and Shift Summary Report ID.
- Cashier Bill Rounding: This is an important setting defining how Inventory Item Price will be rounded off in the Cashier Bill. This may be useful in situations where giving out change in very small currency denominations is difficult.
- Round To Nearest setting defines by how many units the price is to be rounded of. The input accepts floating type numbers as well as Integers.
- Rounding Mode There are 4 options for this setting, Blank(meaning NO Rounding), Floor, Mid and Ceiling. This options can be seen below:
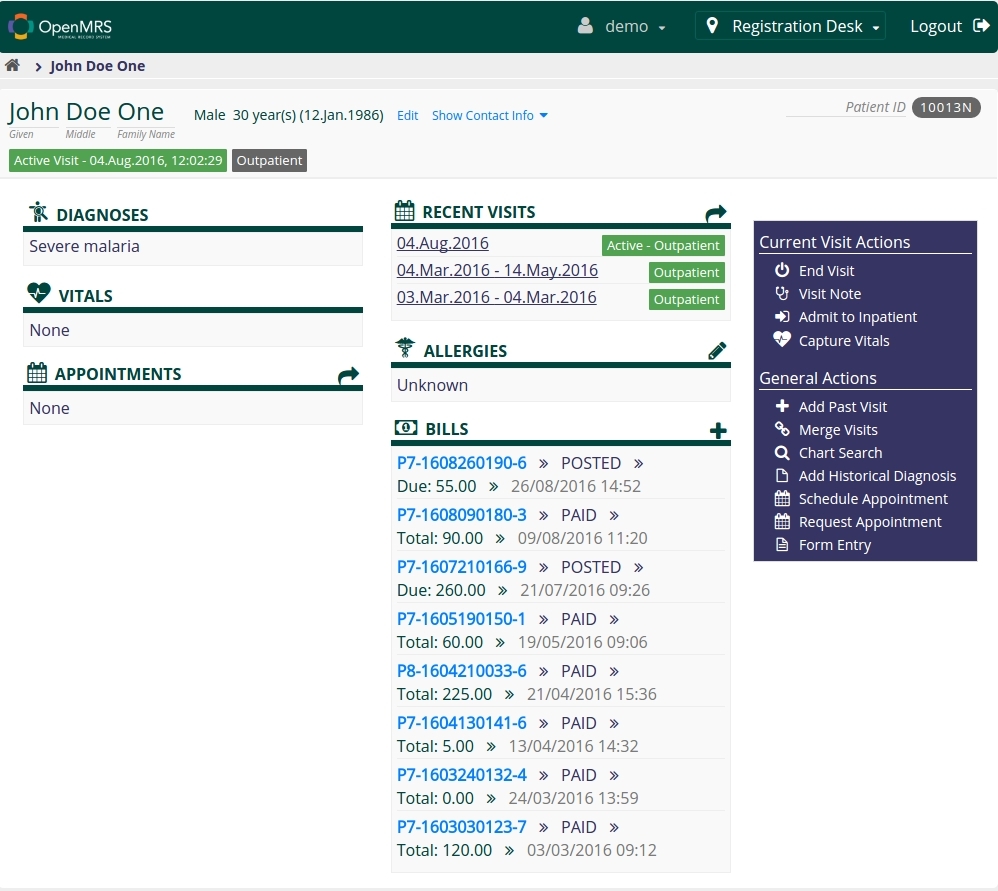
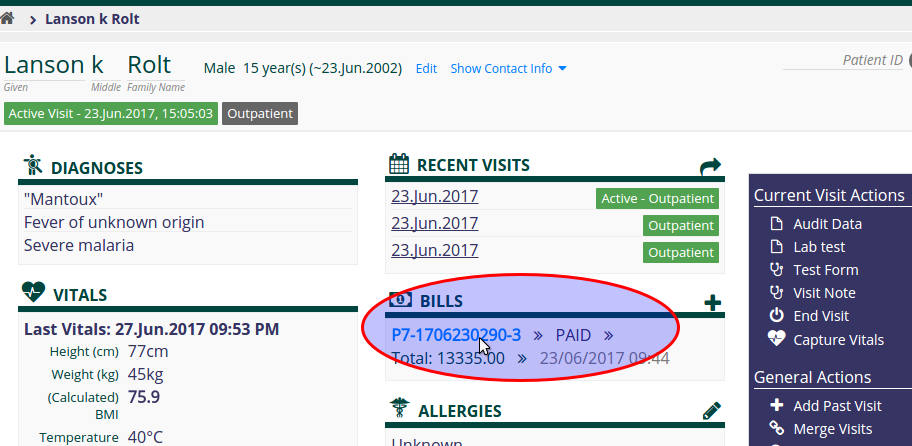
 Number of Bills on the Patient Dashboard: On OpenMRS 2.x, it is possible to view the last X number of Patient's Bills on the Patient Dashboard. The Bills are displayed in descending order that is from the Patient's Last Bill downwards. Patient Dashboard Number of Bills To Display defines how many bills to display. For example:
- Defining Other Reports: There are 3 other reports that can be defined in the Settings Page that is Default Receipt Report ID, Department Collections Report ID and Department Revenue Report ID.
- Default Receipt Report ID: Jasper Report used to Generate Receipts on the Bill Page
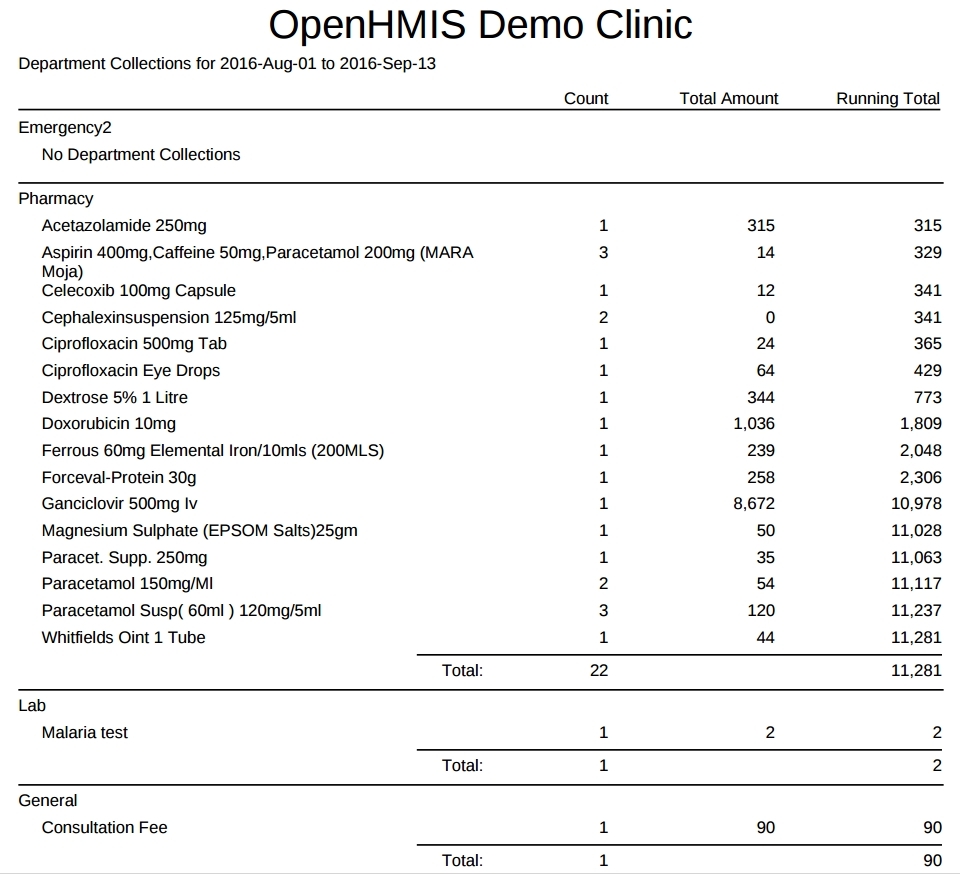
- Department Collections Report ID: Report showing the Inventory Items and Departments and Total Amount:
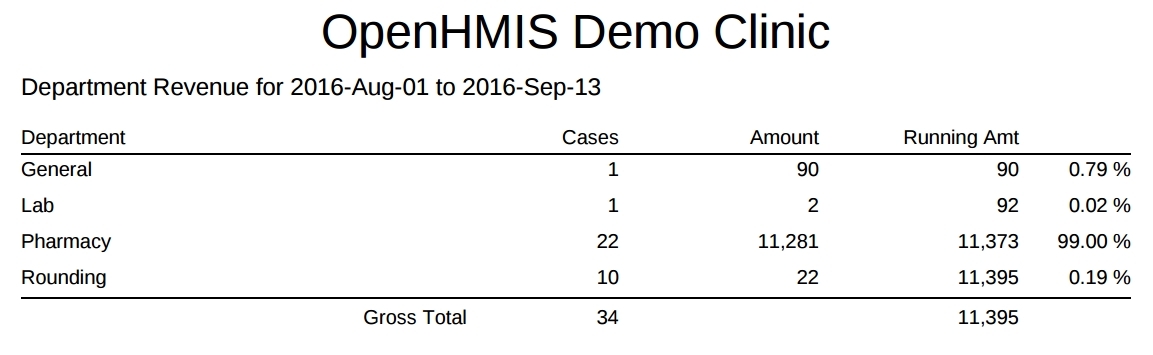
- Department Revenue Report ID: Summary of the Amount collected per department report:
- Department Revenue Report ID: Summary of the Amount collected per department report:
NOTE:The Above Reports need to be first added to the Jasper Reports Module as explained in the Reports Administration section.
The above Settings can also be configured from the Cashier Global Options as explained below. This is especially useful incase once is using OpenMRS platform 1.9.x and can be seen in the screenshot below:
Cashier Global Options
Most of the configuration for the Cashier Module is done through global options which can be accessed via the Administration / Settings page (Screenshot Above). For detailed instructions on configuring Global Options click here
Parameter | Description | Valid Values | Default |
Cashier Adjustment Reason Field | Setting Defining whether or not Cashiers Need to Enter a Reason for Adjusting a Bill. | true or false | false |
Cashier Allow Adjustments | Setting Defining whether or not Adjusting a Bill is allowed | true or false | true |
Cashier Autofill Payment Amount | When set to True, this option populates the Amount TextBox in the Payments Section of the Cashier Bill with the Total Amount due from the selected Line Items. | true or false | false |
Cashier Default Receipt Report Id | ID of the Jasper report to use for generating a receipt on the Bill Page. | An integer value X this value is acquired from the desired jasper report in Report Administration | null |
Cashier Default Receipt Report Id | ID of the Jasper report to use for generating a receipt on the Bill Page. | An integer value X this value is acquired from the desired jasper report in Report Administration | null |
Cashier Default Shift Report Id | ID of the Jasper report to use for generating a cashier shift report. | An integer value X this value is acquired from the desired jasper report in Report Administration | null |
Cashier Patient Dashboard 2 Bill Count | Number of Bills that will be displayed on the Patient Dashboard on OpenMRS Reference Application 2.x | An integer value X | 5 |
Cashier Daily Shift Summary | ID of the Jasper report to use for generating a cashier daily shift summary report. | An integer value X this value is acquired from the desired jasper report in Report Administration | null |
Cashier Reports Department Collections | ID of the Jasper report to use for generating a Department and Inventory Item Total Amount collected report. | An integer value X this value is acquired from the desired jasper report in Report Administration | null |
Cashier Reports Department Revenue | ID of the Jasper report to use for generating a Department summary Total Amount of revenue collected report. | An integer value X this value is acquired from the desired jasper report in Report Administration | null |
Cashier Reports Shift Summary | ID of the Jasper report to use for generating a cashier shift summary report. | An integer value X this value is acquired from the desired jasper report in Report Administration | null |
Cashier Round To Nearest | This setting defines by how many units the price is to be rounded of. The input accepts floating type numbers as well as Integers. | a floating type number or integer (e.g., 1, 0.5, 0.01) | null |
Cashier Rounding Dept Id | A rounding department is need when setting up rounding. Check process for getting the rounding department id from the section #LINK | An integer value X this value is acquired from the database inv_department table explained in Report Administration | null |
Cashier Rounding Item Id | A rounding item is need when setting up rounding. Check process for getting the rounding item id from the section #LINK | An integer value X this value is acquired from the database inv_item table explained in Report Administration | null |
Cashier Rounding Mode | This setting defines how to do rounding for Bill Total Amounts | MID: round to nearest half FLOOR: always round down CEILING: always round up | null |
Cashier System Receipt Number Generator | Once a user defines a receipt number from the #Manage Receipt Number Generator Page, the Fully qualified class name of the receipt number generator is stored in this setting. The receipt number generator is best setup using the the #Manage Receipt Number Generator Page. |
| null |
Cashier Timesheet Required | This setting defines whether or not a cashier needs to have an active time sheet before they can be able to create or modify a bill. | true or false | false |
Configuring Cashier Bill Rounding
- If you are using the OpenMRS 2.x Navigate to the Cashier settings page as described above otherwise you can also navigate to the Administration / Settings page described above.
- From the Cashier Settings Page Set the Round to Nearest value e.g 5 which means round to the nearest 5 units
- Next select the Rounding Mode e.g CEILING which means always round up
Creating Rounding Department and Rounding Item
- Click on the Inventory Button on the OpenMRS Dashboard and then Click on Manage Inventory Module Page and then Click on Manage Department and then click on New Department:
 |  |  |  |  |
- Enter the New Department's Name and Description. It's best to use the Department Name as "Rounding" for purposes of clarity and reporting:
 |  |
- Next Create a Rounding Item. From Manage Inventory Module, Click on Mange Items then Click on New Item.
 |  |  |
- Enter "Rounding as the Name of the item", Select the Department as "Rounding" and then Check the :Has Physical Inventory" Check box and Add a price of 0.00 as per the screenshot and then Save the Item:


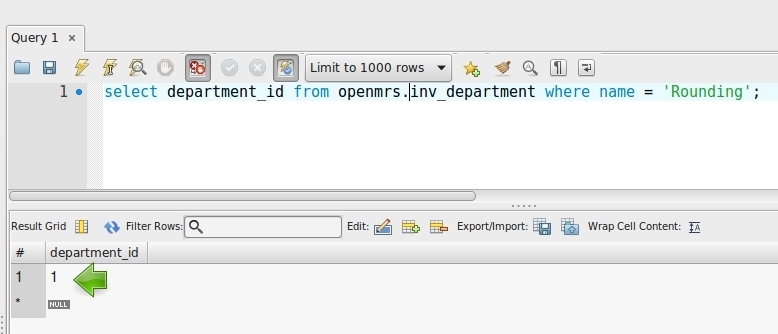
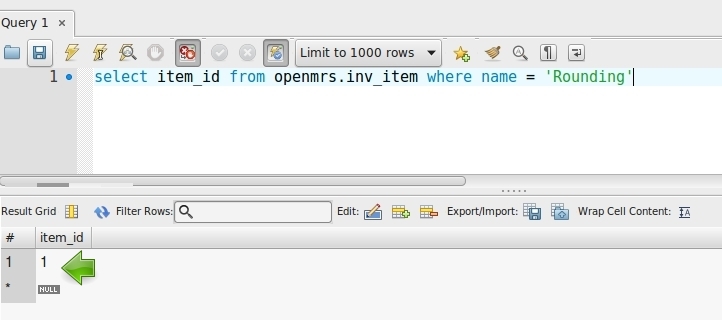
- Using a data base client like MySQL Workbench, get the Rounding department_id and item_id using the following queries: NB: Remember the include the name of your database e.g incase your database is called openmrs then use this name in the query e.g:
- select department_id from openmrs.inv_department where name = 'Rounding';
- select item_id from openmrs.inv_item where name = 'Rounding';
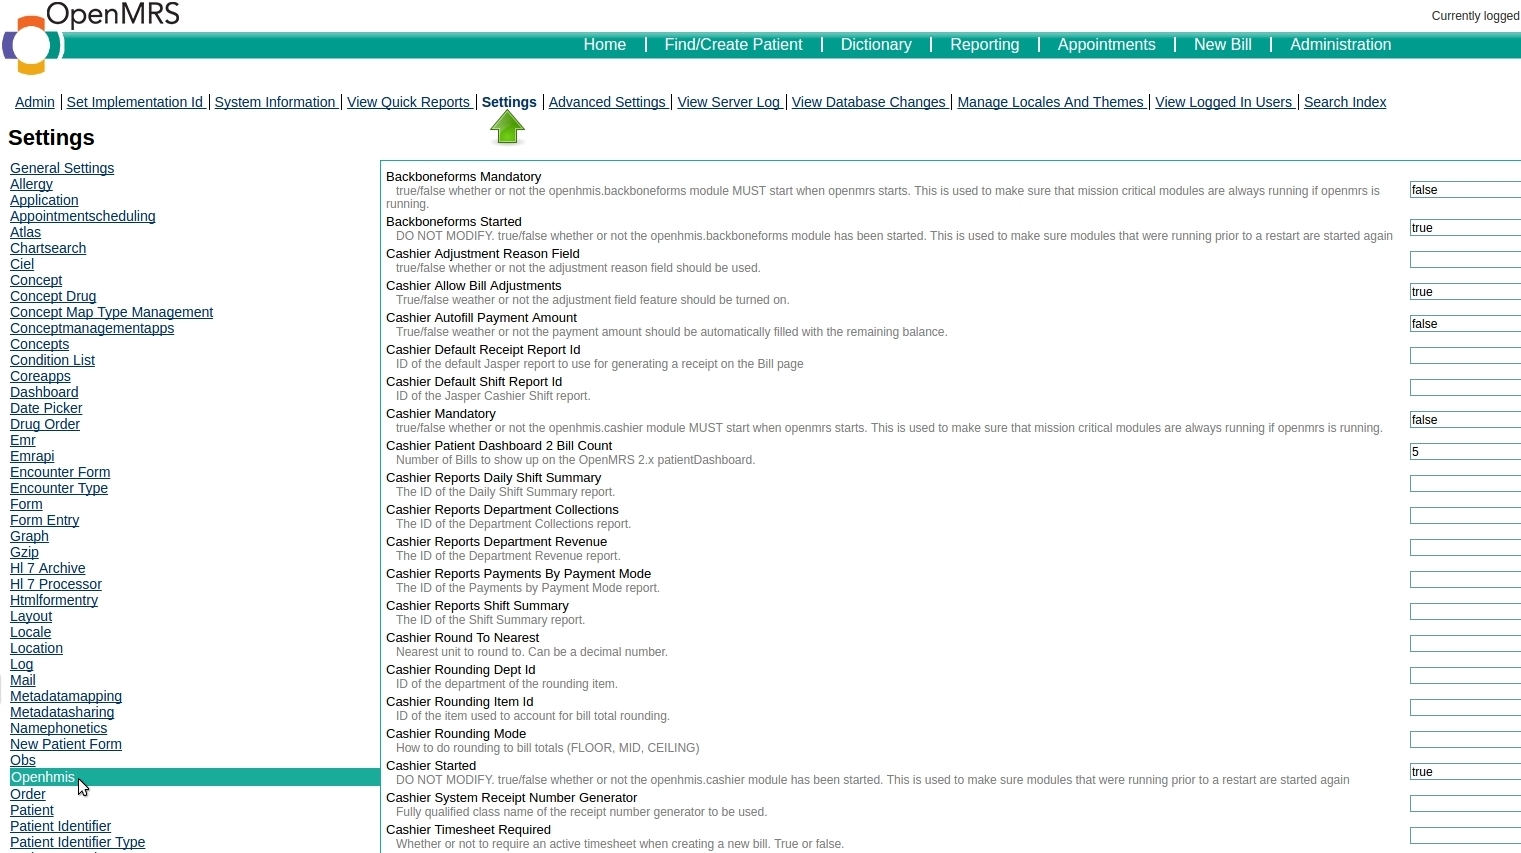
- With this Rounding Department ID and Rounding Item ID, Navigate to System Administration -> Advanced Administration -> Maintenance and click on the Settings Link then Click on OpenHMIS:
 |  |  |  |  |
|---|
- Now Enter the Rounding Department ID and Rounding Item ID in the Cashier Rounding Dept Id and Cashier Rounding Item ID text boxes in the settings page and then save as shown below:

- After saving, you have now successfully set up Cashier Bill Rounding.
- Now go to the Cashier Settings and then enter a "Rounding Mode" and "Round To Nearest" value.
- NB:// If you dont want any rounding, set "Round To Nearest " to "0"(zero). Just make sure "Rounding Mode" and "Round To Nearest" have some value otherwise you will get an error when trying to process a bill.
Creating Cashier User
- All Cashiers must have a User account and be assigned to the Cashier role, for more information on adding users and assigning roles click https://openmrs.atlassian.net/wiki/display/docs/Administering+Users
- Set up Cashiers as Providers. To setup cashiers as providers using the following instructions:
1. Click System Administration |  |
2. Click Advanced Administration |  |
3. Now follow from Step 2 for the Classic UI below |
|
Classic UI
1. Click Administration |  |
2. Click on the Manage Providers link. |  |
3. Click on the Add Provider link |  |
4. (Optional) Type in an Identifier for the provider An identifier is used to generally describe the role of the provider. Eg Cashier, Clerk, Doctor, Nurse etc |  |
5. Enter the Person or Provider Name of the user you want to set up as a cashier |  |
6. Click Save |  |
Module Administration
With the new version of OpenHMIS (that is version 2.0+), the Cashier application will appear on the OpenMRS home page as shown below:
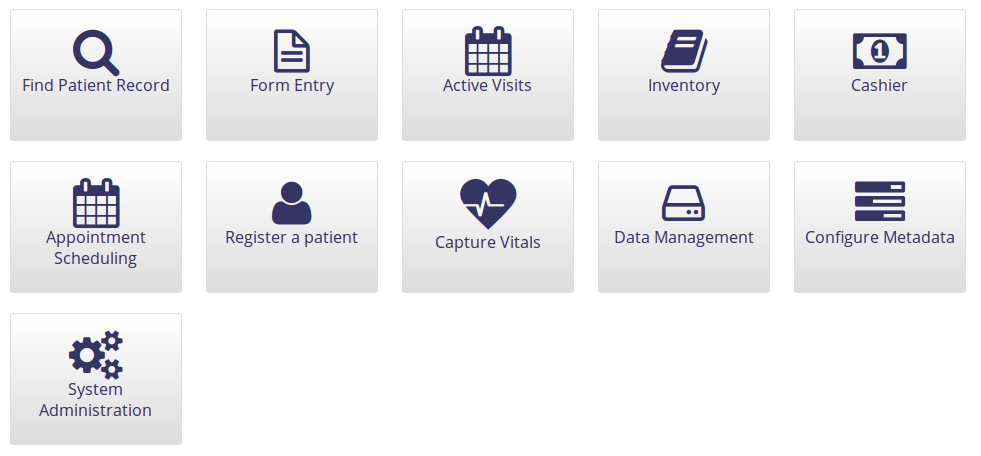
Click on the Cashier application/button and you will be redirected the Cashier Task page as shown below:

At the Cashier task page, you can either Create new bill, make a Timesheet Entry/Generate Shift Report or Manage Cashier Module.
In order to manage the cashier module, click on the Manage Cashier Module application and you will be redirected to the OpenHMIS Cashier Module page.
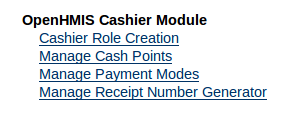
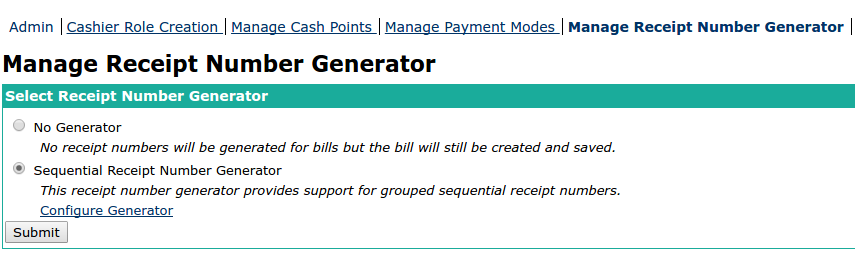
This page enables one to create a cashier role, manage cash points, manage payment modes and manage the receipt number generator.
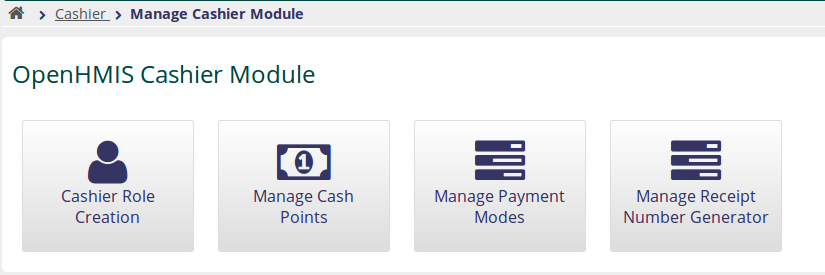
A description of each of the settings above can be seen below:
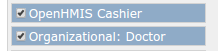
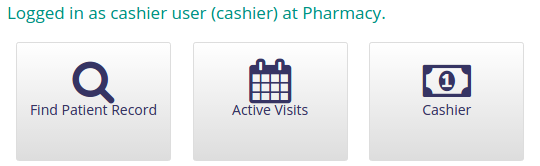
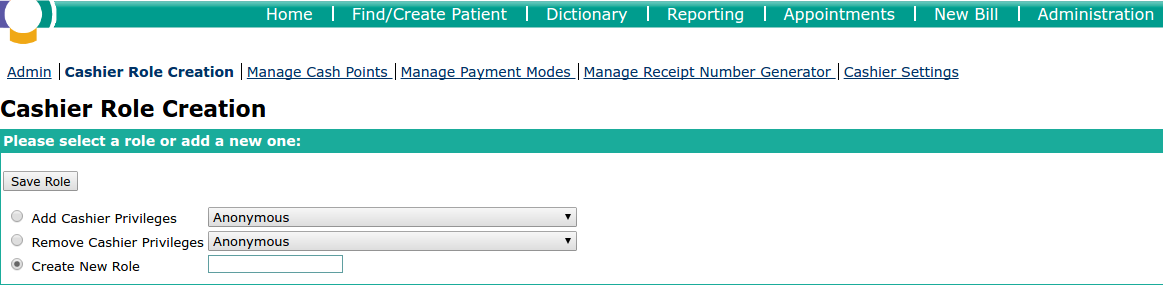
Cashier Role Creation | Used to Add and Remove cashier privileges. Also for creating new roles. NB: Once you create a cashier user, assign them the cashier role you created. NB: Aside from the cashier role, you can assign a cashier the openmrs "Organizational Doctor" role. This allows the cashier to have access to the "Find Patient and Active Visits" button. They need these privileges in order to be able to Adjust a bill.
|  | ||||
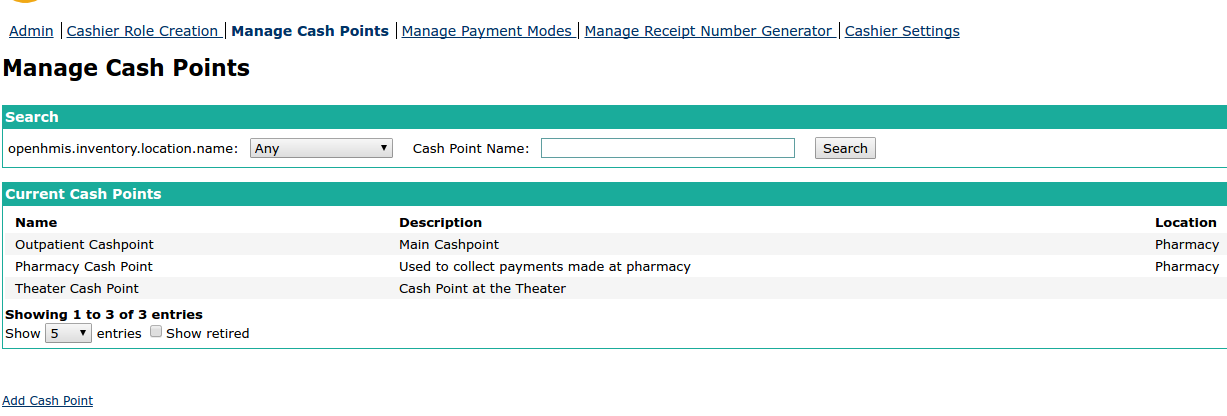
Manage Cash Points | Manage the physical locations that are used to collect cash and process payments. These can be used when a cashier clocks in for a shift, and are associated with bills for auditing purposes. | 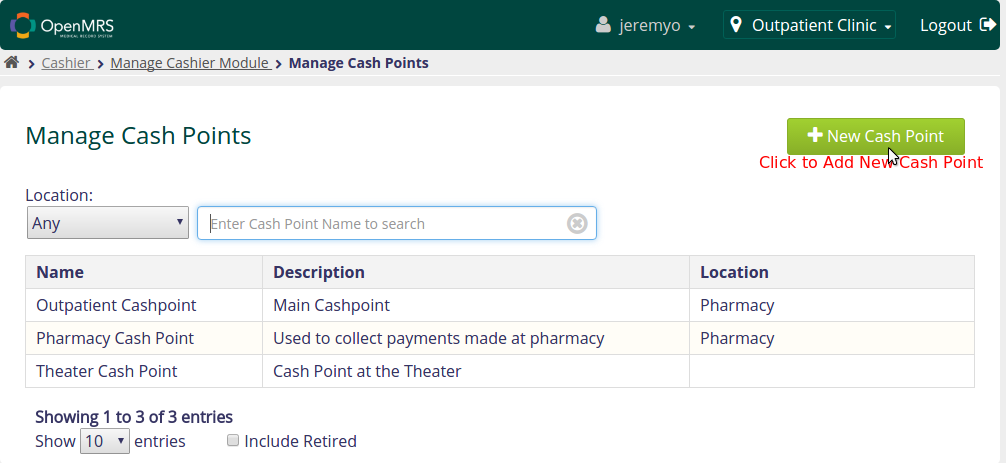 | ||||
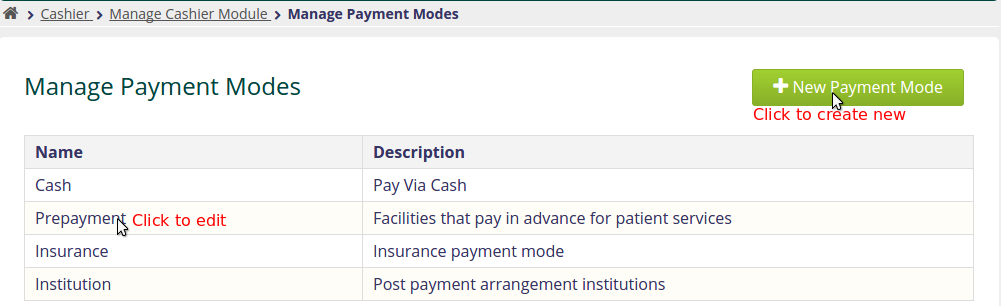
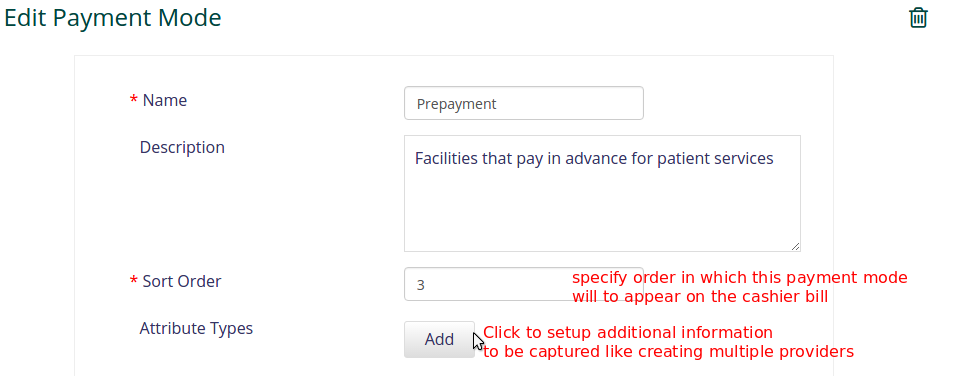
Manage Payment Modes | Manage the ways that customers are allowed to pay for bills. A payment mode can be as simple as cash payment, where only an amount is necessary, or more complex, such as a credit card payment, where it may be necessary to record a name, a credit card type and a transaction number. Payment mode attributes are specified in the same way as Person Attribute Types, including the ability to prompt for a Concept value. |
| ||||
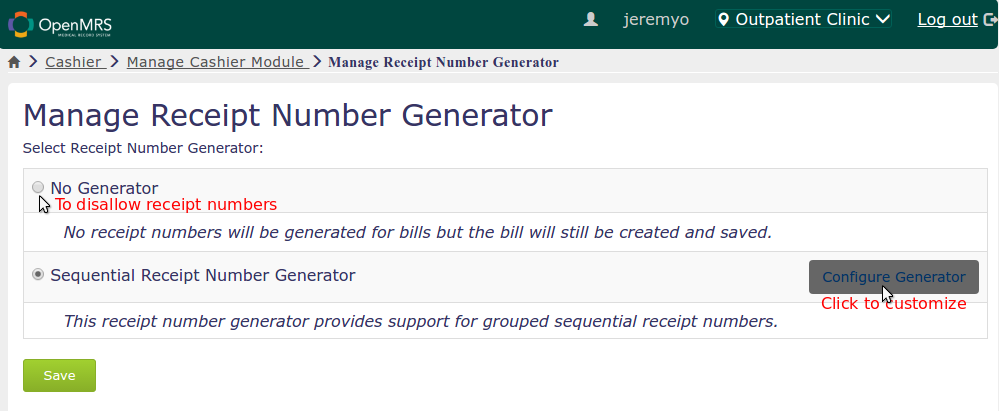
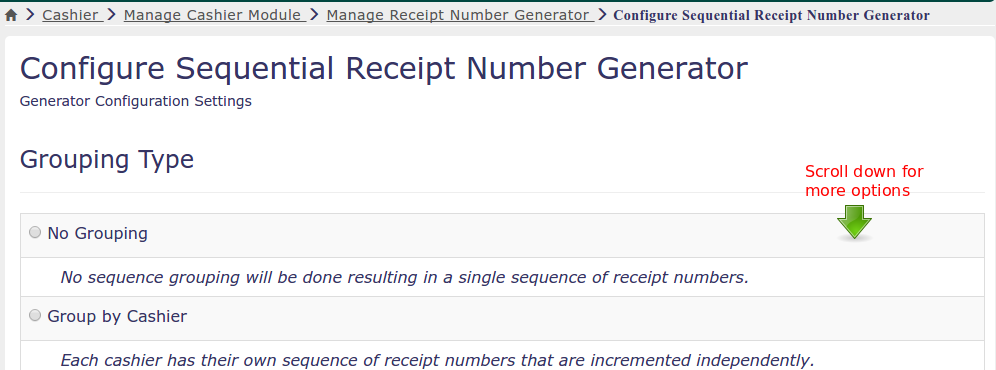
Manage Receipt Number Generator | Configure the fields that you want to be included in the receipts numbers that are generated by the cashier module. For example, include the cashier, cash point and along with date and time. You could also choose not to have receipt numbers. |
|
OpenMRS Platform 1.9.x module configuration
If you are using OpenMRS Platform version 1.9.x then:
When the Cashier Module has been activated/loaded/installed, an OpenHMIS Cashier Module section will appear in the administration as show below:

Then the Cashier Module could be configured through the Cashier Settings page, in the System Administration -> Advanced Administration page:
 |  |  |  |
|---|
Report Administration
The Cashier Module provides the ability to print invoices/receipts, but before an invoice/receipt can be printed a new report needs to be added to the Jasper Report Module. Once the new report is added in Jasper Report Module then go to Cashier Settings Page and click on the drop down for any of reports and select the name of the report you saved in Jasper Reports.
NB: It is possible to create a new Jasper Report from scratch, for more information on this click Jasper Report Module. However if time is of the essence then download one of the samples provided on github: https://github.com/OpenHMIS/reports
Workflow
- Create a Report Archive
- Add a new report into Jasper Report Module
- Configure Global Properties for Cashier Reports
- Testing the report printing
Creating a Report Archive
A Report Archive usually contains several .rjxml files. One file is the top level report file and the other files are subreport files referenced to by the top level report file.
- Select all required .jrxml files and compress them into a .zip file using 7zip, Winzip or other file compression utility
- Give the .zip file a descriptive filename
Adding a new report in Jasper Reporting Module
- Navigate to Jasper Report Module
- 2.0 UI – Click System Administration, then click Advanced Administration, under the Jasper Report Module heading click Manage Jasper Reports
- Classic UI – Click Administration, under the Jasper Report Module heading click Manage Jasper Reports
2. Click Add report,
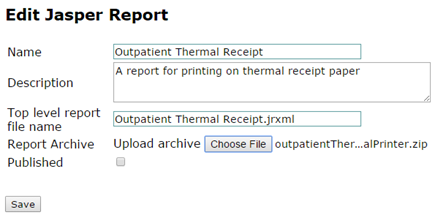
- Type the Name of the report
- Type a Description for the report
- Type in the name of the Top Level report filename. Eg Outpatient Thermal Receipt.jrxml
- Upload the Report Archive by clicking Choose File
Click Save
- Then Go to the Cashier Settings Page
- Click on the report drop-down and select the name of the report that you saved above e.g

Alternative: Configuring Cashier Reports from OpenMRS Settings Page
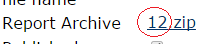
- On the “Cashier Invoice” or “Thermal Receipt” report just created, click Edit Report

- Record, note or remember the value in Report Archive (exclude “.zip”), this is the Jasper Report ID
- Change the Mapped Class value to java.lang.Integer for the for the billId Report Parameter

- Save the report to close it
- Navigate to Settings
- 2.0 UI – Click System Administration, then click Manage Settings
- Classic UI – Click Administration, under the Maintenance heading click Settings, then click Openhmis
- Updating the Cashier Default Receipt Report Id value
- 2.0 UI –
- Find openhmis.cashier.defaultReceiptReportId
- Click to edit the setting
- Change the Value to the same as the Jasper Report ID as the one noted in Step 4 of Add a new report into Jasper Report Module instructions above
- Click Save
- Classic UI –
- Find Cashier Default Receipt Report Id
- Change the value to the same as the Jasper Report ID as the one noted in Step 4 of Add a new report into Jasper Report Module instructions above
- Click Save
- 2.0 UI –
Test the Report Printing
To test that the report prints correctly a patient must have previously paid a bill.
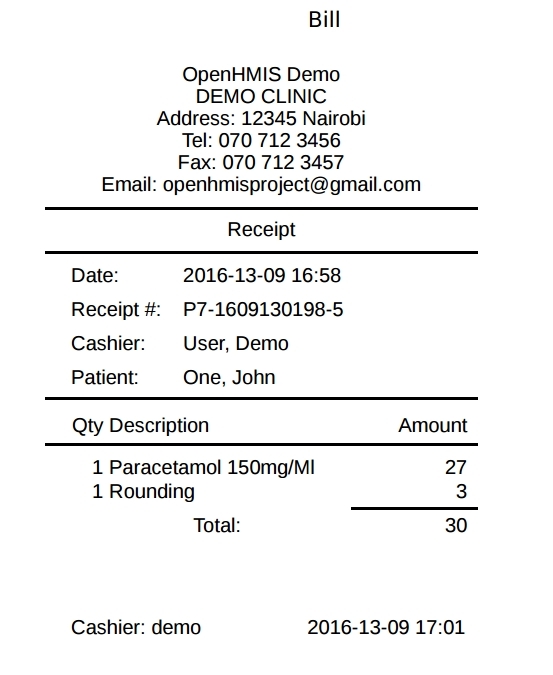
| Navigate to Find/Create New Patient | Search and select a patient to get to the Patient dashboard | Click on the Receipt Number of a bill that has a status of “Paid” or “Posted” | Click Print Receipt button and proceed to print the receipt using the default print options | Sample Receipt |
|---|---|---|---|---|
 | 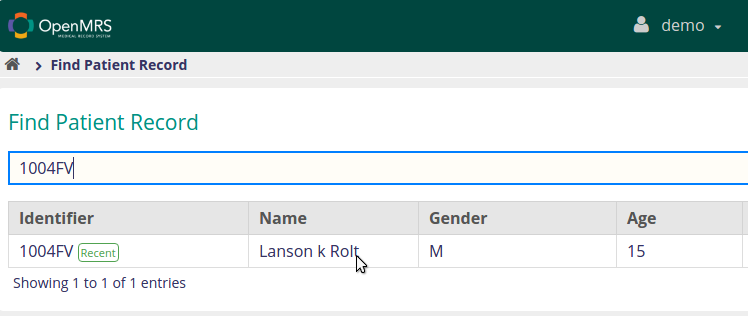 |  |  | 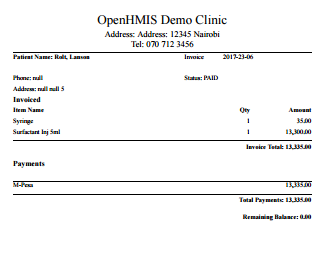 |
The receipt should print out successfully showing the company details, list items, payments made and the remaining balance
Bill Screen
To create a new bill, click on the Cashier button from the home screen, then Cashier Tasks and finally Create new bill. If timesheets are enabled in the cashier settings page, then clicking Create new bill will redirect you to the Cashier Timesheet Entry page.
From the Timesheet page, select a Cashpoint then Clock In and Save to be redirected to the New Bill creation page:
Creating a New Bill | 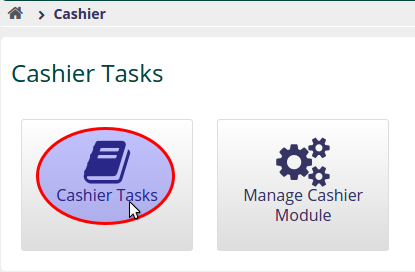 | 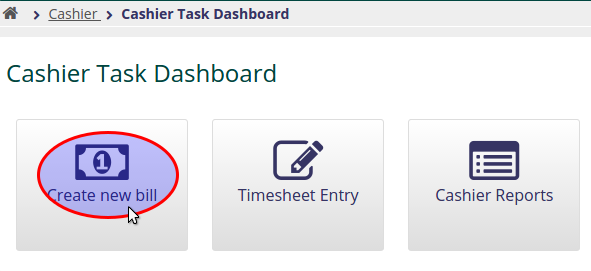 | 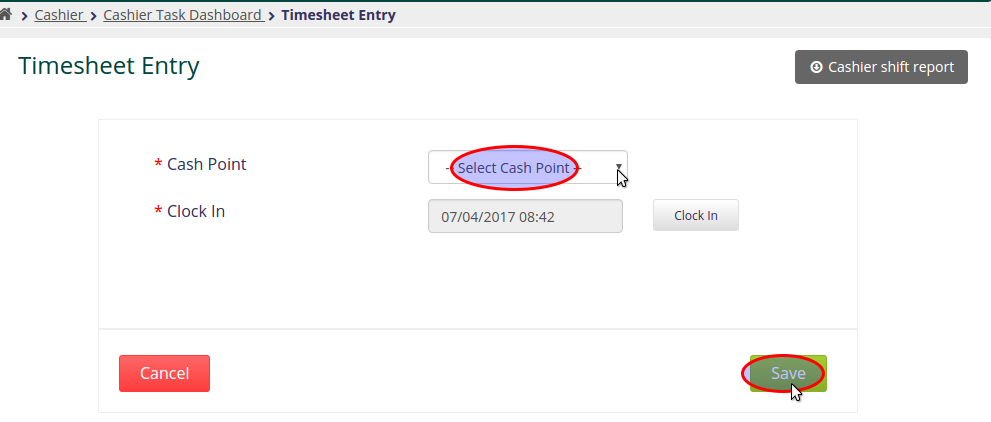 | 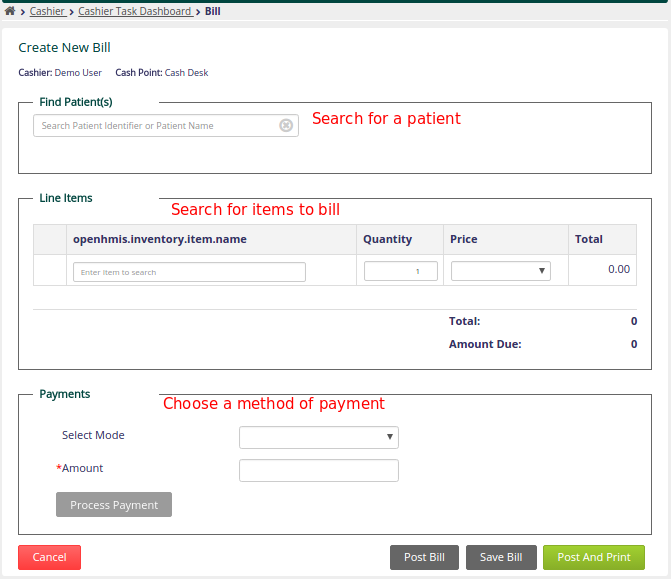 |
|---|---|---|---|---|
Sample bill | 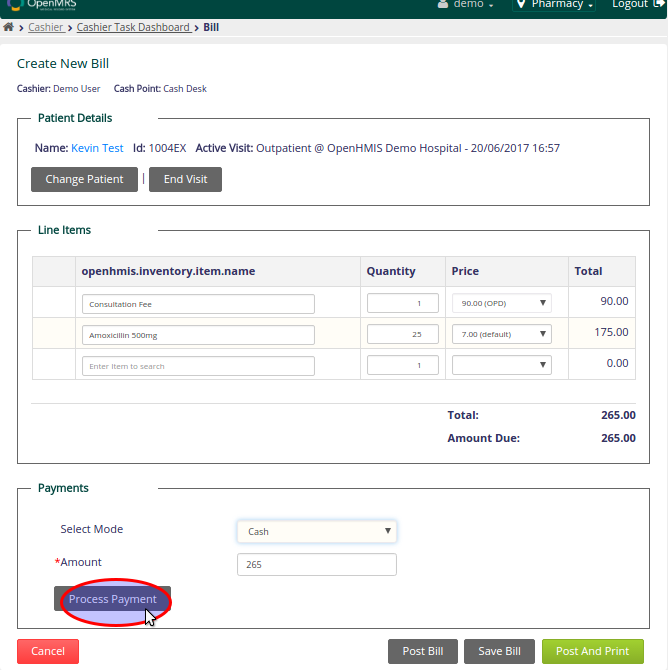 | 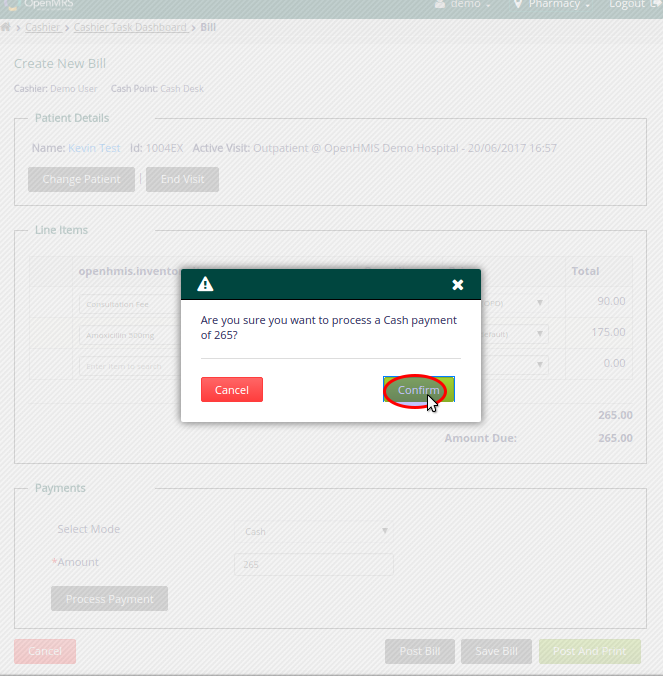 | 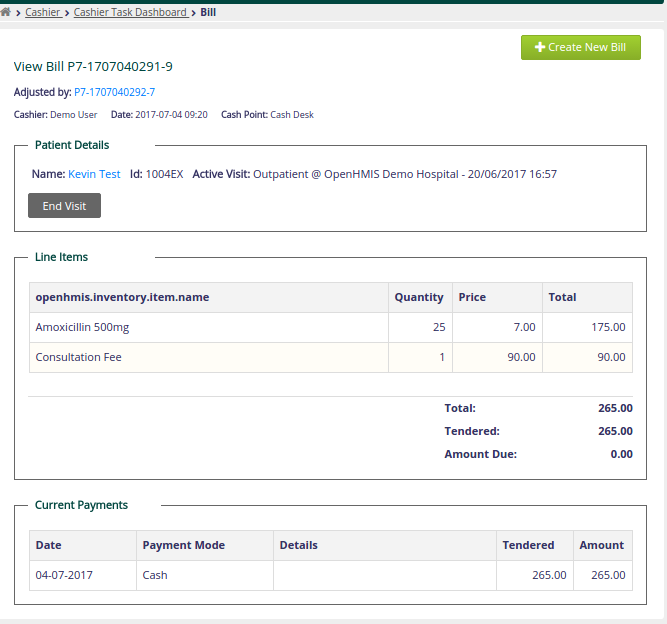 |
Bill Page Sections
|
The bill screen can be divided into five sections:
|
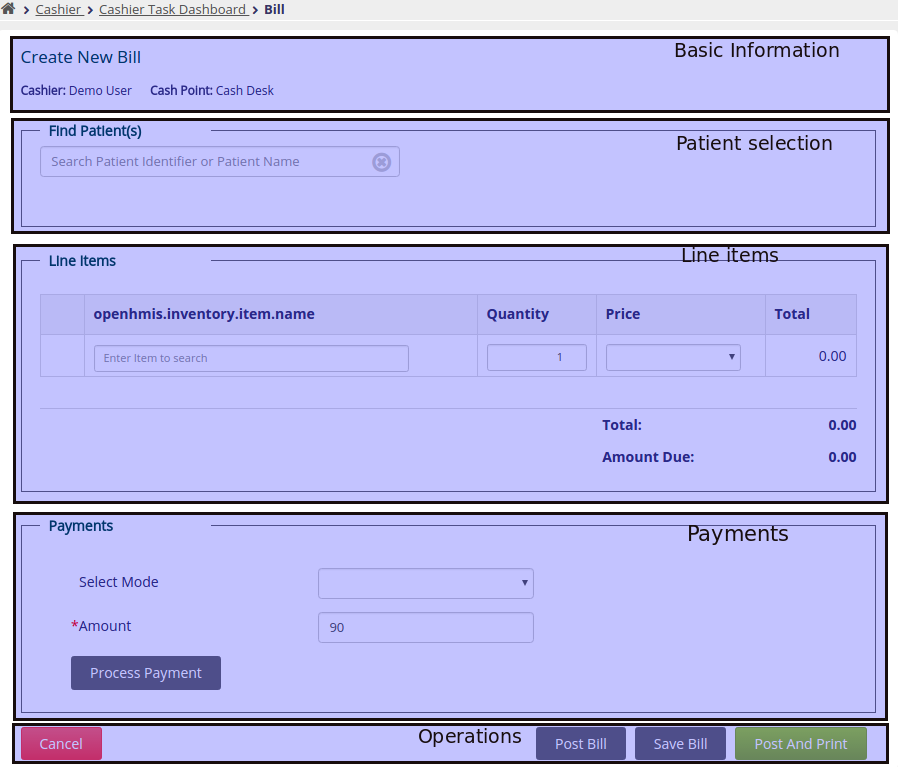
Basic Bill Information
This section displays information such as the cashier and cash point associated with the bill. When viewing a saved bill, the receipt number and date of the bill will also be shown. Also, if the current cashier is not clocked in (and this is not required---see Configuration), he/she will be able to choose the cash point to associate with the bill.
Patient Selection
This section shows the patient associated with the bill. If no patient has been selected, or if the bill is being edited and a user wishes to change the selected patient, it is possible to search for a patient by name or identifier and select any existing patient.
Line items: Adding and Editing
The line items section of the bill screen displays all billable items for the bill. There is always a blank line at the end of the list which allows for the entry of a new item. Line items for a bill that has not been posted can also be removed using the trash can at the left of the line.
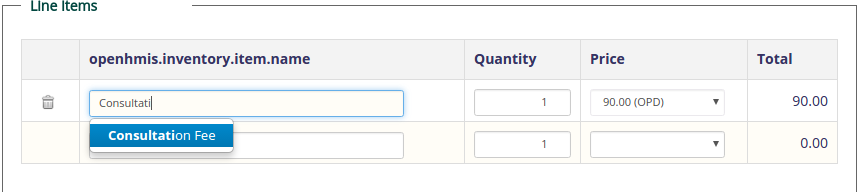
To choose an item for a new line item entry, or to edit a previously chosen item, begin typing the name or the identifier of the item. With a search string of at least three characters, the system will search the item inventory and show a list of results. The desired result can be selected with the mouse or by using the up/down arrow keys.
The changes to a line are validated and saved by pressing Enter or if the line loses focus (i.e., upon clicking another area of the screen).
A summary of the bill is displayed at the bottom of the line items section, indicating the total of the line items, the total amount tendered by the client, and the change due, if applicable.
Payments and Payment Processing/Operations
This is the section where payment information is recorded. A bill can be settled using multiple payments or can be partially settled. This is explained in the bill states section below:
Cashier Bill States
Bills can be in one of the following states. For a patient with multiple bills, you can see these on their patient dashboard:
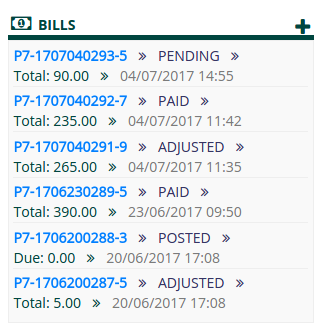
- Pending: The bill has all of the required information (i.e. patient, and at least one line item) and has been saved. Pending bills can be edited without the need of a bill adjustment. A bill enters this state when you click on "Save Bill" from the Bill Page.
- Posted: The bill is automatically posted when the total of the payment(s) processed is not equal to the bill's total. It can also be manually posted using the "Post Bill" button. Posted bills can be printed.
- Paid: A posted bill is marked as paid when the total of the payments processed is equal to (or greater than) the bill's total. A paid bill can still be adjusted.
- Adjusted: A bill is marked as adjusted when a new bill is created to adjust it. The Bill Screen will indicate that a bill has been adjusted and provide a link to the adjusting bill. Adjusted bills are stored for auditing but can no longer be modified or printed from the Bill Screen.
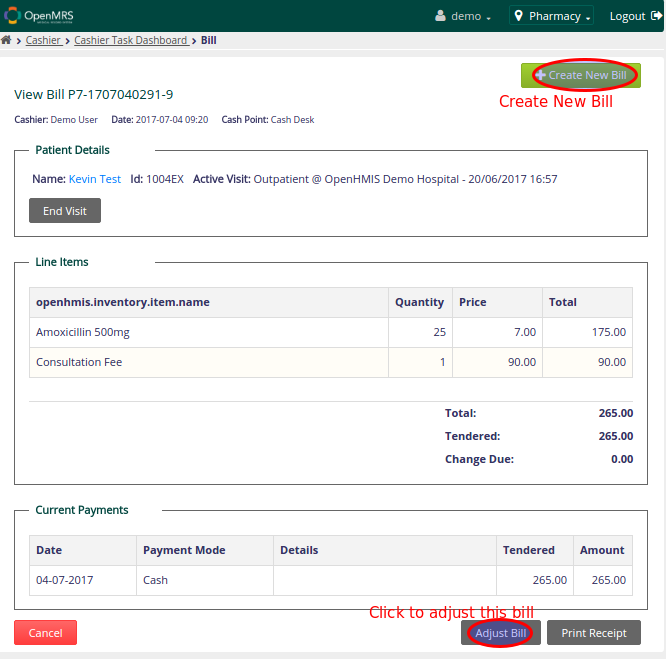
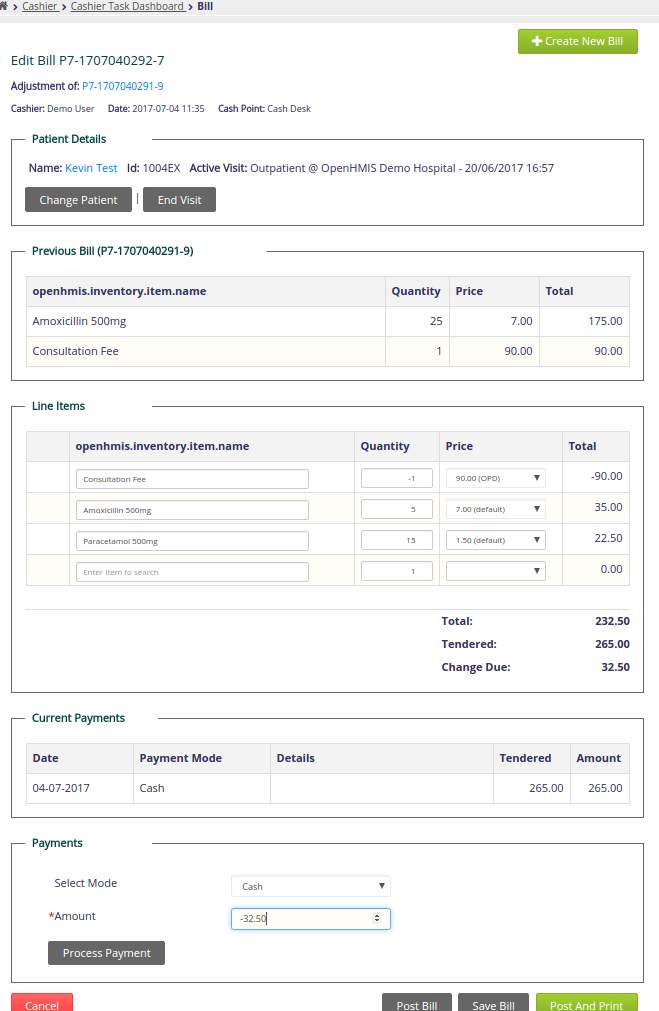
Adjusting a Bill
To make changes to a bill that has been posted or paid, it is necessary to perform a bill adjustment. Adjusting a bill creates a new bill, preserving a link to the adjusted bill for auditing purposes.
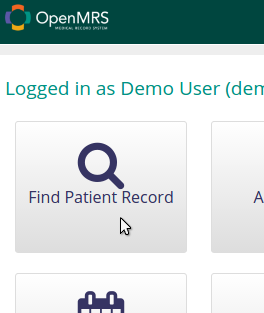
- From the homepage, Click on "Find Patient Record" and search for the patient who's bill you want to adjust.
- Then click on the patient from the search results and you will be re-directed to patient's dashboard.
- From the patient dashboard, you will then see the "Bills" section.
- Click on the Bill that you want to adjust.
- From the resulting screen, click on adjust bill button as shown below.
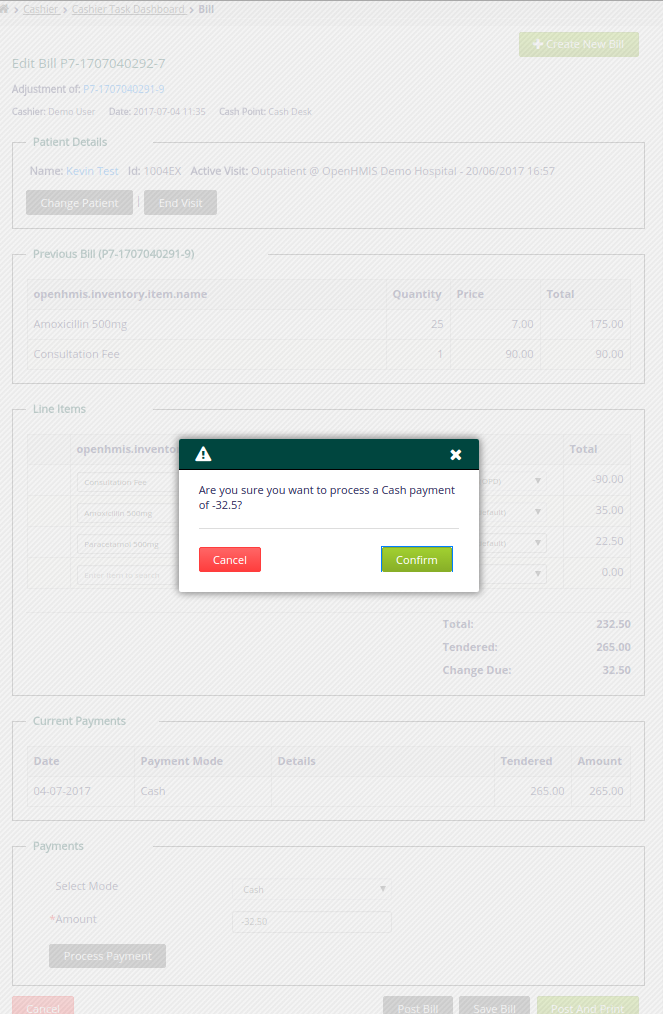
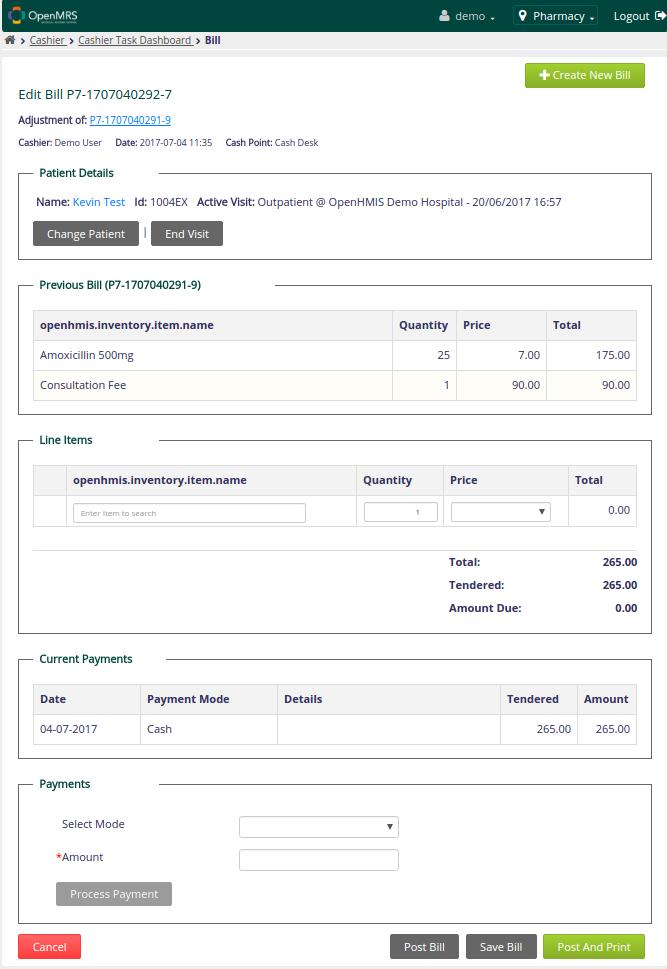
- On the new adjusted bill page, you can add new line items or remove an item that was in the original bill. You can do this by searching for the same item in the "Line Items" and then in the quantity, add a negative (-) and then the figure/number you want to remove e.g if on the original bill you charged 5 items then in the adjusted bill line items section, put -5 to remove/negate the item. See example below:
| Click on Adjust Bill | Confirm you want to Adjust Bill | New Bill page for adjusting is opened | Enter line items that you are adjusting. Then adjust payments | Complete Adjustment | View or print adjusted bill |
|---|---|---|---|---|---|
 |  |  |  | | 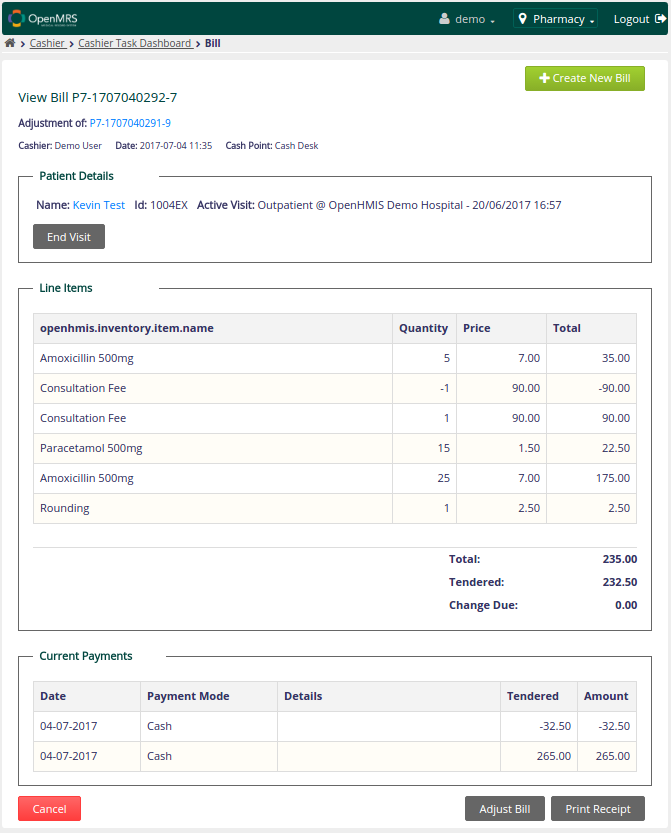 |
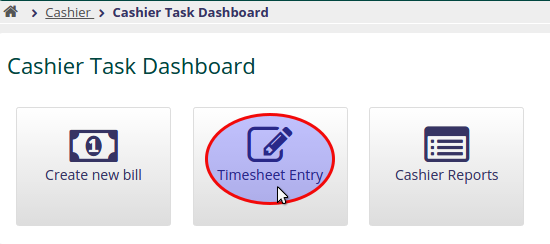
Timesheet Entry
The Cashier Module supports tracking cashier shifts by having a cashier clock in at the beginning of a shift (or after breaks) and clocking out when leaving the terminal. When clocking in, use the "Clock In" button to update the Clock In Date/Time. Use the "Clock Out" button in the same way when clocking out.
When a cashier has a current timesheet (i.e., he/she is clocked in), the cash point will be automatically set when creating a new bill.
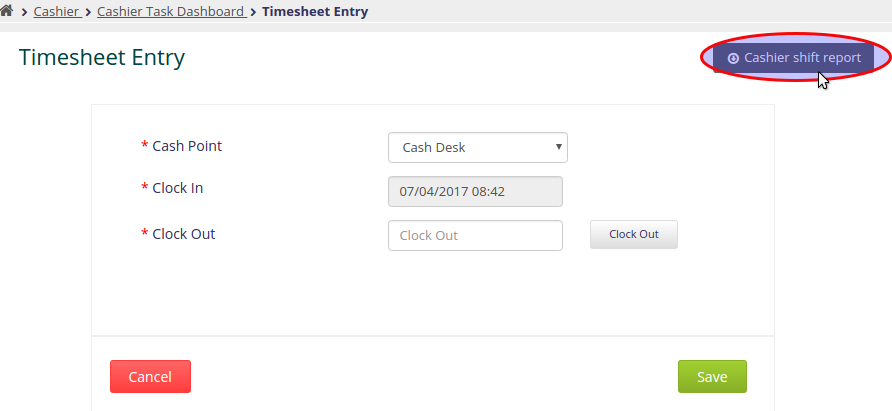
Any bills that are processed during period that the cashier clocked in and clocked out can be seen from "Cashier shift report" button that is on this page.
To navigate to the Timesheet Entry page:
| Cashier Tasks | Cashier Task Dashboard | Timesheet Entry Page | Cashier shift report |
|---|---|---|---|
|  | 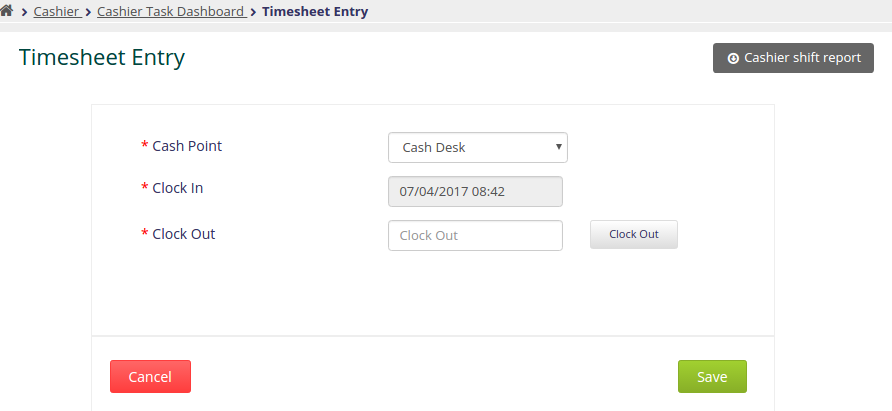 |  |
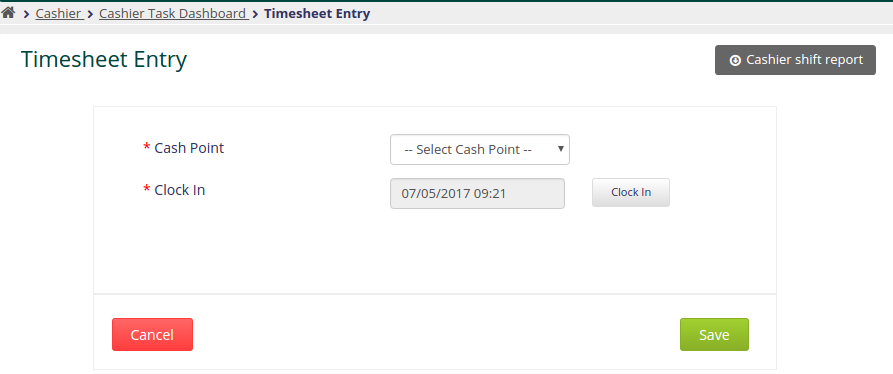
Clock In
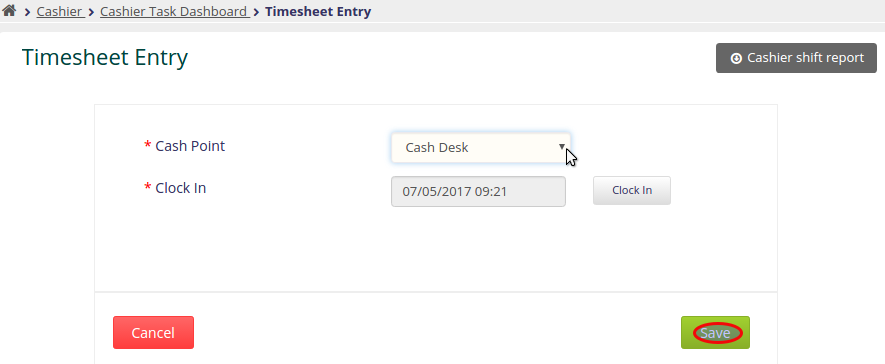
To clock in, navigate to the timesheet entry page and click on clock in and then save:
| Cashier Task Dashboard | Timesheet Entry Page | Select Cashpoint and Clock IN | Save |
|---|---|---|---|
|  |  |  |
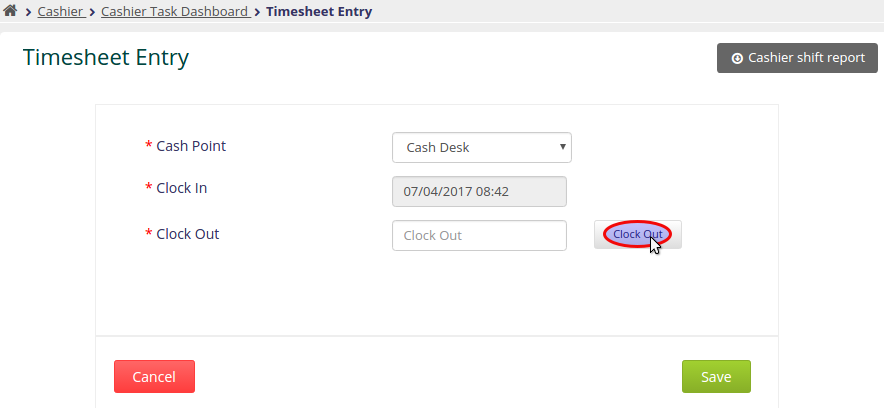
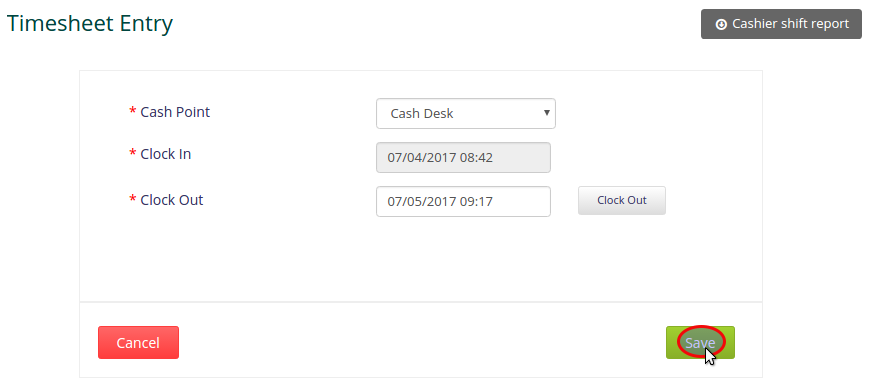
Clock Out
To clock out, navigate to the Timesheet entry page, and then click on the "Clock Out" button and it will fill in the clock out time and then click "Save":
| Cashier Task Dashboard | Timesheet Entry Page | Clock OUT | Save |
|---|---|---|---|
| |  |  |
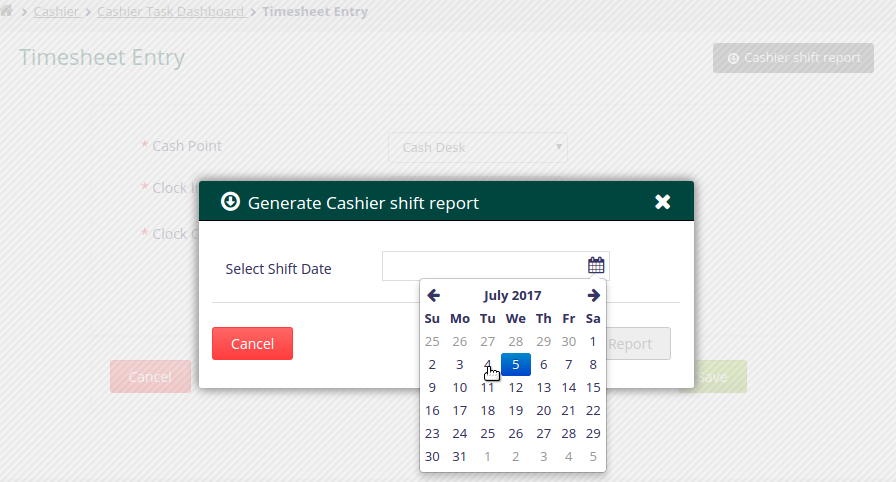
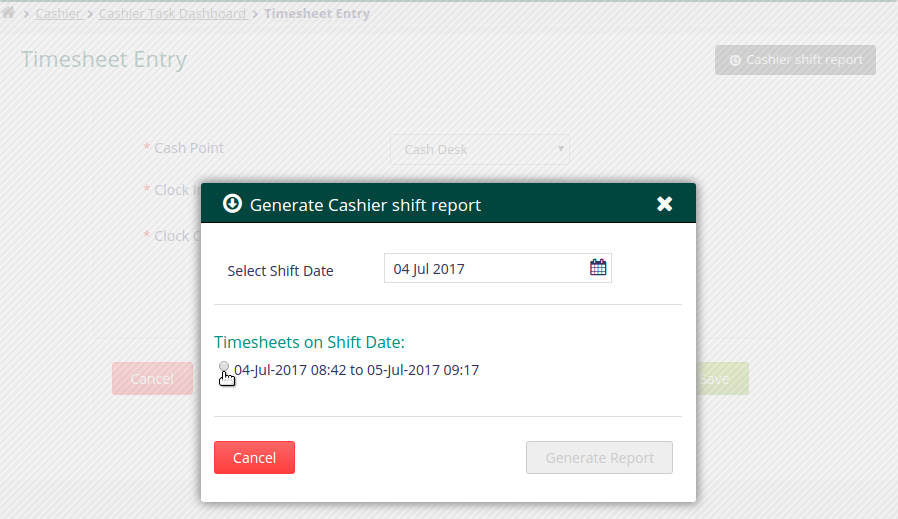
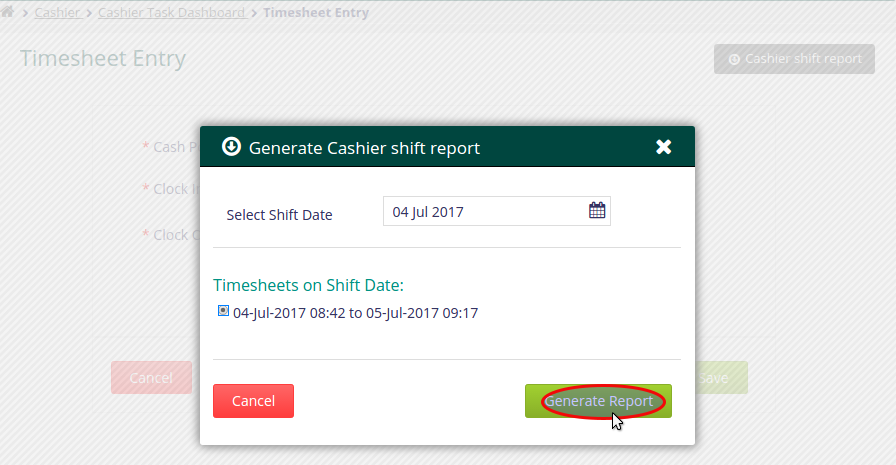
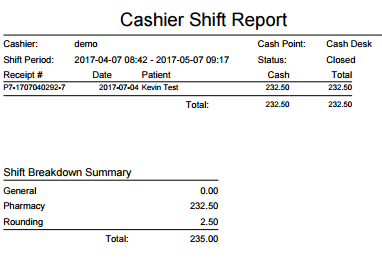
Generate Cashier shift report
To generate a shift report, from the Time-sheet Entry Page, click on the "Cashier shift report" button. Then select the date and period you want to generate a report:
| Click on Cashier shift report | Select shift report date | Select the particular shift period | Generate the report | Report generated | Open report |
|---|---|---|---|---|---|
|  |  |  |  |  |
Cashier Reports
This page is used to generate Cashier specific reports that were added as explained in the reports section above.
To generate reports, click on the Cashier Reports button from the Cashier Task Dashboard:
Navigate to Reports Page | 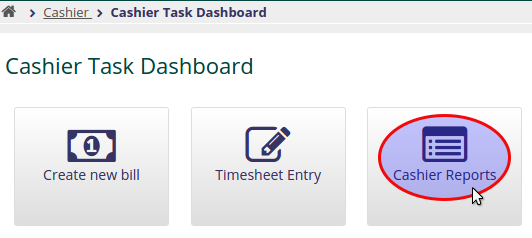 | 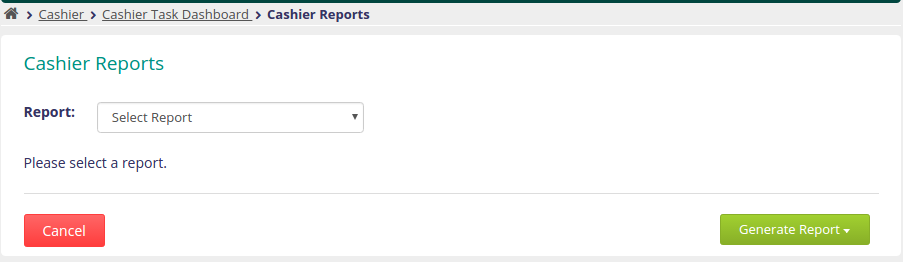 | 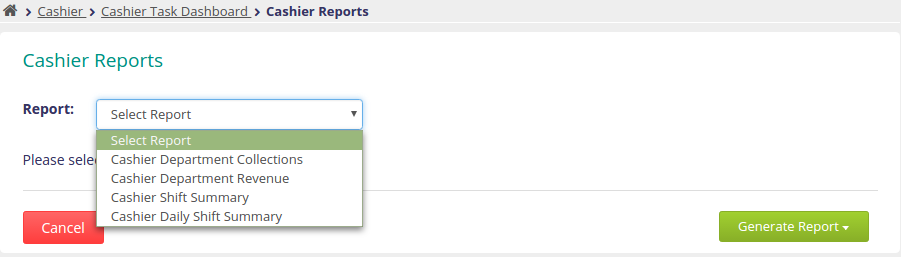 |  |
|---|---|---|---|---|
Generate Report | 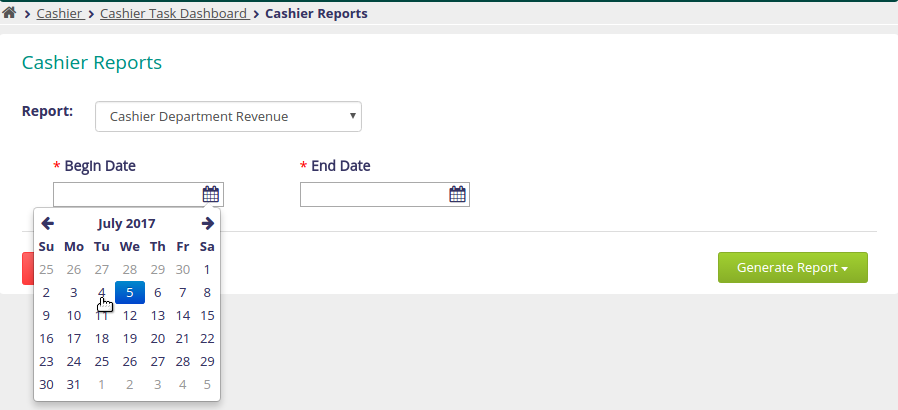 | 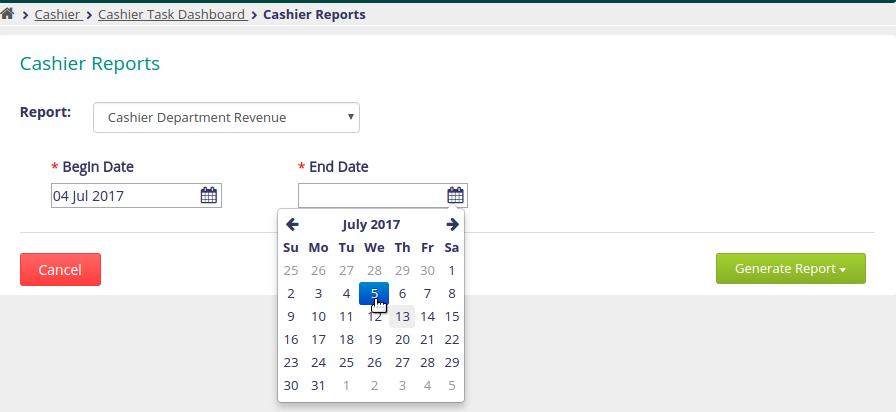 | 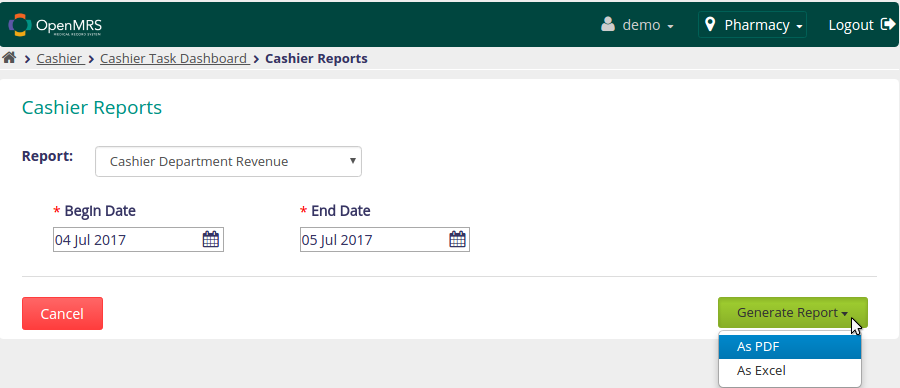 | 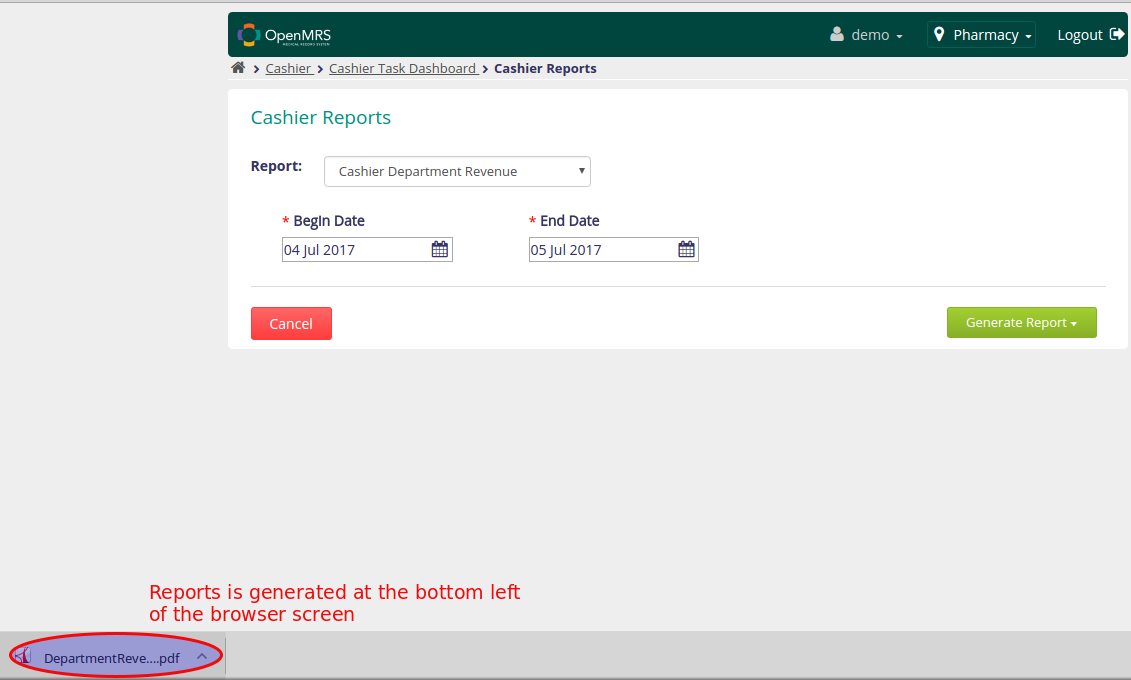 |
The report generated above can be seen when you open the generated file, for example:
